Windows 10 has been an amazing success ever since it was released on July 29, 2015. Still, if you are someone who seems to be comfortable with the older version of Windows Operation System like Windows 7, Windows Vista, and Windows XP or want to revert to one of them, then you can uninstall Windows 10 and roll it back to whichever version you prefer.
The guide below will help you switch back to Windows 8.1. The basic steps work for any Windows Operating System like Windows XP, Windows Vista, and Windows 7, though we do not recommend going that far back as Microsoft ended support for it some time ago. Be aware, too, that new computers (especially tablets) may contain components that were not manufactured when older Windows versions like Windows 8.1 or Windows 7 were being sold.
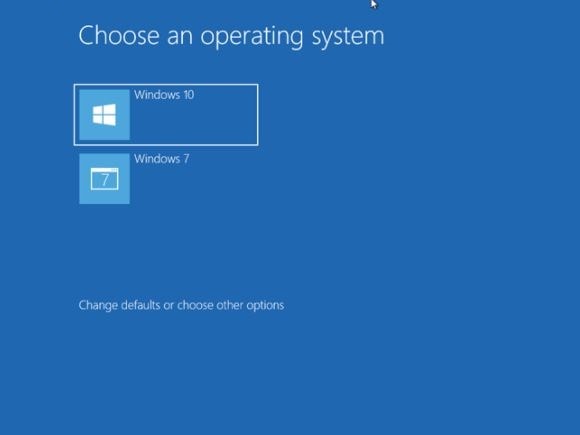
There are two distinct methods to follow for those who want to roll back to the older version of Windows and uninstall Windows 10. First, if you upgraded from Windows 8.1 or 7 within the last 30 days, there is a more straightforward method of rolling back that takes minimal effort and does not delete your files, which you can read about later on in this post. Second, however, most users will need to install an older version of Windows or switch to Linux to uninstall Windows 10 without leaving behind a blank hard drive.
Step 1: Back Up and Create Installation Media
Before you start the downgrading or uninstalling process, you need to back up your computer files, such as documents, videos, photos, etc., to a separate location. An external drive or a cloud storage service is excellent, so long as it’s physically disconnected from the Windows computer, you will be working on. Unfortunately, Windows can not preserve programs or settings when flashing to an older version, so you will also want to get installation media for any crucial programs, especially those that require serial numbers. It is also worth noting that Microsoft does not support Windows 8 anymore, only Windows 8.1, as it was part of an automatic update cycle.
Back-Up and Create Installation Media
It is a good practice to download drivers for your computer’s various components before you begin the installation process. Doing so will make it easier to get everything up and running if Windows does not automatically select the appropriate drivers. Motherboard chipset, Ethernet, Wi-Fi, and graphics drivers, in particular, can make the setup process much more manageable. Then, store these drivers on a USB thumb drive for easy access once Windows is finished installing.
The next process is that you need to get installation media for Windows itself. For Windows 8.1, Microsoft provides a download service that allows you to send the installation files to a new DVD or even use a flash drive. If you install an older version of Windows, you will need the original disc and possibly an external CD or DVD burner if your newer laptop does not have a disc drive. Alternatively, you can create a bootable USB drive with a Windows ISO. You will also need the Windows product key for whichever version you choose. This is the 25-digit code that came with your Windows retail box or purchase receipt from Microsoft. It may also be located somewhere on your computer’s case. How to Uninstall Windows 10.
Guide on Windows 7
Windows 7 is still of occasional utility among power users looking to replicate or fix old software or people who are just stuck in their ways. Unfortunately, Windows 7 can not upgrade, install, or keep files installed on a system already running Windows 10, so a fresh install is the only way to achieve such a goal. Our guide to installing Windows 7 has all the links, detailed instructions, and a few caveats about using older operating systems that may help you troubleshoot esoteric issues. The Windows 8 process is much simpler.
Step 2: How to Install Windows 8.1
Once you have finished backing up all your files and programs, remove all other external storage drives, cards, or discs, and insert the Windows installation disc or drive. Then, please restart your computer and boot it from that drive.
This usually requires either entering a keyboard command to open the boot menu or entering the BIOS (or UEFI on newer systems) and manually selecting the drive. Entering the BIOS usually requires hitting the Delete key, not the Backspace key, over and over on your keyboard immediately after seeing your computer’s splash screen. It usually shows the computer manufacturer. Each computer is different, so consult your motherboard manual if you built the computer yourself or the computer manual to enter the BIOS.
Once you are in the BIOS and want to look for a boot order or a boot override, these settings allow you to choose which device your computer attempts to load first. You want your Windows installation media loading before your hard drive. For discs, select your CD or DVD drive. For thumb drives, select USB or something similar. Again, all motherboards and computers are slightly different, so make sure to have your manual handy.
The Windows setup process will then begin. For Windows 8.1, the first screen lets you select your language, location, and keyboard localization. Click Next, then Install Now. Finally, wait for the setup process to initiate.
Step 3: Installation
Click I Accept The License Terms, then Next on the license screen. The next screen has two options: Upgrade and Custom. Choose Custom, and the Windows 8.1 installation system cannot upgrade from a newer Windows version to an older one.
On this screen, you will have to select the installation drive or partition. If your computer has only one hard drive or SSD, then this is the largest partition available. You have two options: Click the drive and then click Next to preserve old Windows files in a folder in the new installation. This is useful as a secondary backup method. But it will not keep installed programs, and there may be compatibility or permission issues with accessing the old files. Generally, it’s better to start fresh by formatting the install drive: Do this by clicking Format, then OK. Next, wait for the primary drive to be formatted, then click Next.
The setup program will copy the Windows files from your installation media to your computer and begin installing the operating system itself on the next screen. This process may take quite some time, so if you have something else to do, for thirty minutes to an hour. After that, it is fine to leave your computer alone, so long as it is plugged in. Keep an eye on the screen and return when the process is finished. Your computer may restart on its own.
After a few minutes, you should see Windows 8.1 begin its first bootup process. Here, you will select a few settings and personal touches. Just follow the on-screen instructions, entering your username and password where prompted. Click Finish.
Alternate Method: For Windows 8.1 and 7 Free Upgrades
If you’ve utilized Microsoft’s free upgrade from Windows 8.1 or 7 to Windows 10. You can use a more automated process to downgrade your software from Windows itself. At the same time, this process is easier than the above because it will preserve some of your files. It’s always a good idea to back up personal data just in case something goes wrong. That’s an appealing option, but there are some caveats.
The process used to work up to 30 days after the upgrade, but ever since the Windows 10 Anniversary Update, that’s been reduced to just 10 days after the update. Some claim to have methods of extending that, but we wouldn’t rely on it.
Regardless, after the allotted time. The operating system will delete the previous OS files to make room on the hard drive. If you have run Windows 10’s disk cleanup operation, it may have prematurely deleted those files already. But only if you run it manually.
This process also won’t let you roll back to Windows 8, only Windows 8.1. This is because part of the Windows 10 upgrade process involves moving to 8.1. So that’s technically the last OS installed on the system. If you want Windows 8 proper, you will have to use the instructions above, and even then, only if you have the original installation media and turn off updates.
Go to the main Settings menu in Windows 10. Click Recovery, then click Go Back to Windows 8.1 or Go Back to Windows 7 and follow the on-screen instructions.
For Windows 8.1 and 7 Free Upgrades
Before any instructions pop up, though, you will see a question asking why you want to return to an earlier Windows version. You can answer however you’d like. It won’t affect your recovery process; Windows is just collecting data for their research. Then, a message will inform you that your files won’t go anywhere in this process. In contrast, it’s right that your files won’t disappear. It’s still up to you to reinstall applications and restore customized settings properly.
Reverting to an earlier Windows can sometimes revert your password. So keep that in mind when the screen prompts a password to log in. Likewise, you might need to use your old password if you change to a new one when you upgrade to Windows 10.
When you’re ready to begin the recovery process, select Go Back to Previous
Windows and the system will start rolling back. This operation will take a while, and your computer will reboot several times.
Keep in mind that you can only try this process in the first month after upgrading, and it isn’t compatible with any earlier Windows versions. The recovery will preserve your local files, but not your settings or any third-party programs on How to Uninstall Windows 10.
Would you like to read more about Windows Operating System-related articles? If so, we invite you to take a look at our other tech topics before you leave!
Use our Internet marketing service to help you rank on the first page of SERP.


