
How to enable Secure Boot: Recently there have been reports that PCs are failing to boot correctly after upgrading to Windows 11, and the reason for this seems to be Secure Boot not being enabled on the machine. To install Windows 11, you need to ensure your computer has Secure Boot turned on.
Otherwise, you’ll get an error message asking you to enable it before proceeding. If you’re not sure what this means, don’t worry – this article will explain how to enable Secure Boot on your PC and help you get started with your Windows 11 installation without any trouble!
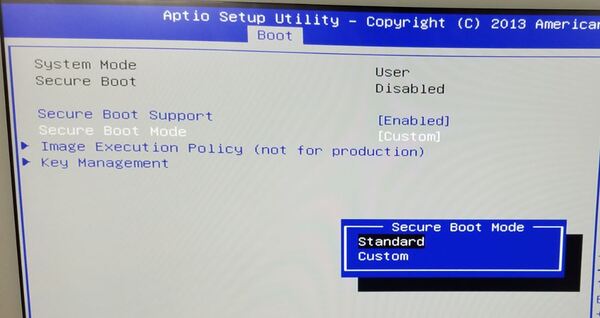
Enable Secure Boot in BIOS
Turn your machine off, and restart it while pressing F2/Del/F10 (depending on your computer’s brand). After getting into BIOS, use left/right arrow keys to navigate to Secure Boot or something similar. Could you enable it by changing Custom to On? Save changes, and exit BIOS.
Turn your machine off, and restart it while pressing F2/Del/F10 (depending on your computer’s brand). After getting into BIOS, use the left/right arrow keys to navigate to Secure Boot or something similar. Could you enable it by changing Custom to On? Save changes, and exit BIOS. How To Install Windows 10 On Alienware Laptop – Step By Step Guide
You may also like How to find your Windows 11 Product Key
Enable Secure Boot in the registry
To use Secure Boot, we need to modify some settings in Windows. To do so, we’ll need access to a Command Prompt with administrative privileges. To get there: Click on your Start menu > Type command > Right-click Command Prompt and select Run as administrator. In Command Prompt, type (or copy and paste) bcdedit /set {current} safe boot minimal Restart your computer once you’ve made these changes, and you should be prompted for a BitLocker Recovery Key. In addition, go ahead and enter that key now, so you don’t forget it later when trying to boot up into windows normally. If all goes well, you should be able to proceed into Windows’ setup wizard without further complications.
Enable Safe Mode with Networking
If your computer isn’t booting up or is running slowly, you can troubleshoot it in Safe Mode. Safe Mode loads only fundamental drivers and startup programs so that you can access tools like System Restore or Device Manager. If a third-party application is causing problems, removing it should make things work again. To enter Safe Mode with Networking: Hit F8 when your computer starts, select Troubleshoot > Advanced Options > Startup Settings, and hit Enter. Now select 4 or F4 (for Network) and hit Enter. Your computer will start up in Safe Mode with Networking after 30 seconds or so.
You may also like How To Install Windows 11 on Mac and MacBook Devices
Install Recovery Drive
You’ll need a USB drive with at least 16GB of storage, formatted as NTFS or FAT32. If you’re using NTFS, make sure you don’t have any folders in your root directory; otherwise, files copied onto your recovery drive may not be accessible. Next, download and run Microsoft’s official instructions for creating a bootable WinRE rescue media. Your computer will restart and enter a command line (you can just let it sit there). When it boots back up again and gets to the login screen, hit Ctrl+Shift+F3 to bring up WinRE.
Select Apply Security Updates and select your USB drive from the list of drives connected to your system. Then click OK until everything is done. Now that secure boot is disabled, you should see an icon for Repair Your Computer under Settings > Update & Security > Recovery when rebooting your machine; click that instead of Windows 10’s regular Start menu icon to repair/restore from a previous version of Windows and change secure boot back on afterwards. Launch Command Prompt as administrator—right-click anywhere in its Start menu folder and select Run as administrator—and type: bcdedit /set {default} bootmenupolicy legacy before hitting Enter.
From Recovery Drive Installer, select Repair your computer
A bootable recovery drive can help you reinstall or repair your version of Windows. You’ll need a separate USB flash drive that’s at least 2 GB in size and blank. If your PC comes with a recovery drive, you don’t need a flash drive — insert your computer’s restore disc or system repair disc into your computer’s disc drive, restart it, and then press any key when prompted. If there isn’t a restore disc for your version of Windows, contact Microsoft Support for assistance (type contact in Cortana search).
They may be able to send you one for free. Once you’ve installed a recovery tool, use it to create a bootable copy of your currently installed operating system. If necessary, insert your chosen installation media and follow these steps: Hold down Shift while clicking Restart.
In the Choose an option window that appears, select Troubleshoot > Advanced options > Command Prompt. Confirm by typing Y at each of these prompts: Press Enter; type bcdedit /set {default} bootstatuspolicy ignoreallfailures; Press Enter; type bcdedit /set {default} device partition=\Device\HarddiskVolume1; Press Enter; type exit to quit Command Prompt.
You may also like Malware Removal: Best Antivirus Software for 2022
Would you like to read more about How to enable Secure Boot-related articles? If so, we invite you to take a look at our other tech topics before you leave!
![]()


