
Are you having trouble connecting to the internet on your Windows computer? The corruption of the DNS cache is one of the most common factors that contribute to connectivity issues. The quickest way to fix this issue is to clear out the DNS cache and make the computer create a new one from scratch.
However, were you aware that there are several different ways to clear the DNS cache on Windows 11? In this article, we will discuss the many advantages of clearing the DNS cache, as well as the various procedures that can be carried out on a computer running Windows 11. Let’s get right into the meat of the post without further ado.

What is the DNS Cache, and why is it necessary to clear it regularly?
To visit a website, you will typically need to type its URL into the address bar of your browser. URLs, on the other hand, are not something that computers are able to “understand,” instead, each URL is associated with an IP address that the computer is able to use.
Your computer connects to a DNS server, which is a database that stores URLs and the IP addresses that are associated with them, whenever you conduct a search for a website.
The process of looking up an IP address each time is known as a DNS lookup, but it can be very time-consuming, especially for websites that you frequently visit. Therefore, the computer stores a local copy of the DNS in a cache that is referred to as the DNS resolver.
When you search for a URL, it first looks in the resolver cache, and then it uses the information it finds there to locate the website you were looking for.
Because of this, the DNS resolver cache has a risk of becoming corrupt or out of date over time, which can result in connectivity problems. You should also make it a habit to clean the DNS cache regularly because there is a potential threat of DNS cache poisoning, which is why you should make it a habit to clean the DNS cache regularly.
How to delete all recent DNS cache on Windows 11
On Windows 11, you can clear the DNS cache using a variety of different approaches. You have the option of using the Command Prompt, the Run command box, or even PowerShell. In addition, you can delete the DNS cache quickly and easily with just a few clicks by making use of a batch file at any time you see fit. The following is a list of the four different ways to clear DNS on Windows 11:
How to clear DNS cache using Run Command Box
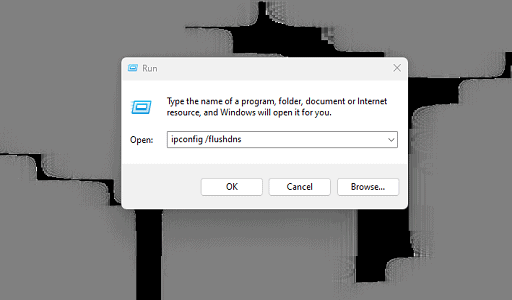
Here are the steps to follow to flush DNS Cache on Windows 11 using the Run command box:
- Press Win + R to launch the Run command box.
- Type “ipconfig /flushdns” command.
- Press Ctrl + Shift + Enter keys together. The Command Prompt will launch, execute the flush command, and close automatically.
How to clear DNS cache using PowerShell
PowerShell has a different command to flush the DNS cache on Windows 11. Here are the steps to follow to flush DNS cache using PowerShell:
- Press Win + S and type PowerShell. Click on the Run as administrator option in the Start menu.
- Now, type “Clear-DnsClientCache” in the PowerShell window and press the Enter key.
![]()


