
How to Disable Access to the Windows Registry: Several times, you may want to disable access to the Windows registry from anyone using your computer or from an internet connection that doesn’t need to access your Registry.
For example, if you work in IT support, it would be helpful to disable the Registry on any computer that you were fixing so that someone can’t go in and modify anything while you’re working on the computer. Here’s how to do it! It’s pretty simple.
Navigate to Computer Management
Before you disable access to your Registry, navigate to Computer Management. From here, you can easily disable access using another tool: Local Security Policy. Select Administrative Tools and open Local Security Policy (you’ll have to click Run if it doesn’t open automatically).
Then select User Rights Assignment from the drop-down menu. Double-click Deny network access to this computer and give yourself permission to disable or enable remote access as you see fit—all from one central location.
You can always change settings again if you want people back on your computer remotely—remember that it’s best practice not to grant everyone administrator privileges unless necessary. Setting up a secure user account for general use is safer than letting everyone log in with admin rights and complete control over everything in sight!
You may also like: How to Change Keyboard Language in Windows
Navigate to System Tools
When trying to disable access to a computer’s Registry, there are two places from which you can launch a disassembler. One is from within Regedit, and one is from within Administrative Tools.
You must first navigate through Control Panel > System and Security > Administrative Tools > Computer Management to reach Regedit. Alternatively, you can search by typing Regedit into your start menu or taskbar search box.
The computer will automatically lead you straight there after typing in that one word. Either way works equally well. After reaching it, follow these steps: 1) Click on Action > Select all 2) Click Action again > Rename 3) Type 99reg as shown below 4) Press Enter 5) Done!
You’ve now successfully locked yourself out of ever going into RegEdit again on that particular system! Note: After closing yourself out, make sure you log out immediately after completing these steps.
Navigate to Security Settings
- Open your Windows registry using Regedit. To do so, click on Start, type in Regedit, and press Enter. This will open up your registry program window.
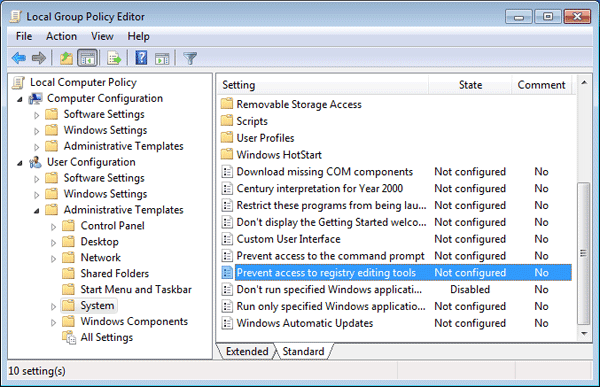
- Navigate to Security Settings: You’ll be presented with a few options at first. For now, head over to Local Computer Policy -> Computer Configuration -> Administrative Templates -> Windows Components and navigate down until you see Registry as shown below.
- Click Allow only signed drivers
- Select Disabled
- Click OK
- That’s it! Now no one will be able to mess around with your system settings or install dangerous drivers that could infect or crash everything!
- Do note, however, that if ever needed, access can always be given again by going back into Local Computer Policy -> Computer Configuration -> Administrative Templates -> Windows Components, where you’ll find Registry in the navigation tree just as before.
- Right-click Allow only signed drivers and select Enable from there to undo all changes made above.
You may also like: How to Download a Windows 10 ISO File Legally
Create New Permissions Assignments
To grant specific users access to registry keys and values, add those users or groups (under the Permissions heading) as a new permission assignment in your registry template file. A Windows registry template is an .adm file with a .admx extension; on most workstations it is C:\Windows\inf.
For example, you can create a new permission assignment that gives your Domain Admins group full access permissions under HKEY_LOCAL_MACHINE\Software\Microsoft by using Regedit. To do so, right-click anywhere in Regedit’s main window and select Permissions. In Regedit’s Permissions dialog box, click Add. The Select Users or Groups dialog box appears. Type Domain Admins and then click OK.
Adjust NTFS and Share permissions accordingly
If you’re running a business, chances are you don’t want your employees snooping around in your essential files. So it’s best to take steps and limit access where you can. When sharing folders on a network, setting NTFS permissions is usually enough; however, if you want more security than that, it’s time to use Share permissions.
In a nutshell, NTFS permissions can determine who has access (e.g., complete control) or no access (e.g., read-only) for specific folders and files. In contrast, Share permissions allow for more granular settings like controlling print/copy functionality and file deletions/rename requests.
Many corporate machines will come with limited user accounts and administrative user accounts, so be sure to set up administrators with proper levels of privilege while keeping regular users at bay. To do so, go into User Accounts and Family Safety in Control Panel > Create a new account. Then head back into Account Settings > Manage another account.
You may also like: How to move Windows 11 Taskbar to Top Screen
Would you like to read more about How to Disable Access to Windows Registry-related articles? If so, we invite you to take a look at our other tech topics before you leave!
![]()


