
With Windows 11, having multiple accounts gives you the ability to create a distinct location for each person that uses the computer, preventing their experience from interfering with your own.
However, if the account is no longer required, it can be deleted in a number of different methods, such as using the Settings app, Control Panel, User Account, Computer Management, Control Panel, or PowerShell. These are just a few of the options.
It is not necessary to terminate an account if you only need to restrict a user’s access to the site temporarily. Instead, you should turn off the user on Windows 11 by following these steps.
This tutorial will walk you through the many options available to you in Windows 11 for deleting accounts.
How to Delete an Account on Windows 11
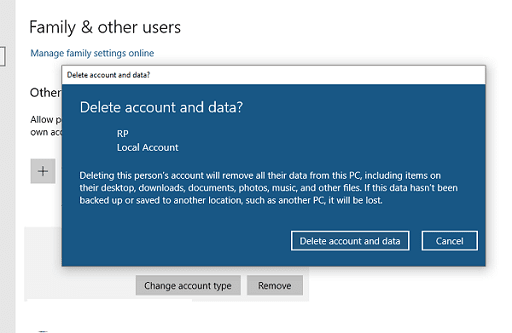
Follow these instructions on a Windows 11 device to delete an account and its associated data using the Setting app:
- Open Settings.
- Click on Accounts.
- Click the Other users page on the right side.
- Select the account and click the Remove button.
- Click the “Delete account and data” button.
Upon completion of the procedures, the user’s account and any associated data files will be eliminated from the system.
You may also like How to delete Discord account
How to Delete an Account on Windows 11 using Computer Management
Follow these steps if you want to delete an account through Computer Management:
- Open Start.
- Search for Computer Management and click the top result to open Computer Management.
- Browse the following path: Computer Management > System Tools > Local Users and Groups > Users
- Right-click the user and select the Delete option.
- Click the Yes button.
After you have finished the instructions, the account will be deleted; nevertheless, the user’s files will continue to be stored in the “Users” folder, which is located under the account name folder.
How to Delete an Account on Windows 11 using User Account
Following these steps will allow you to delete an account using the legacy User Account interface:
- Open Start.
- Search for netplwiz and click the top result to open the legacy User Account interface.
- Select the account to delete on Windows 11.
- Click the Remove button.
- Click the Yes button.
- Click the Apply button.
- Click the OK button.
After you have finished going through the processes, the Windows 11 account will be deleted, but the user’s files will remain intact.
How to Delete an Account on Windows 11 using Control Panel
Follow these procedures in order to delete files and accounts using the Control Panel:
- Open Control Panel.
- Click on User Accounts.
- Click the “Remove user accounts” option.
- Select the account to remove.
- Click the “Delete the account” option.
- Click the Delete Files button to delete the account and files.
- Click the Keep files button to delete the account, keeping the files in the profile folder.
- Click the Delete Account button.
When you have finished going through all of these processes, the account will be deleted from Windows 11.
How to Delete an Account on Windows 11 using Command Prompt
Follow these procedures on a computer running Windows 11 to delete an account using the Command Prompt:
- Open Start.
- Search for Command Prompt, right-click the top result, and select the Run as administrator option.
- Type the following command to note the available user accounts and press Enter: net user
- Type the following command to delete the user account on Windows 11 and press Enter: net user USER-NAME /delete
In the command, replace “USER-NAME” with the account’s name to delete. This example deletes the “JohnDoe” account: net user JohnDoe/delete
When you have finished going through the procedures, the command will erase the account, but the data associated with the account will still be accessible on the computer.
You may also like Can You Restore Deleted Google Activity?
How to Delete an Account on Windows 11 using PowerShell
Following these steps will allow you to delete an account using PowerShell commands on Windows 11:
- Open Start.
- Search for PowerShell, right-click the top result, and select the Run as administrator option.
- Type the following command to note the available user accounts and press Enter: Get-LocalUser
- Type the following command to delete the user account on Windows 11 and press Enter: Remove-LocalUser -Name “USER-ACCOUNT”
In the command, replace “USER-ACCOUNT” with the account’s name to delete. This example deletes the “JohnDoe” account: Remove-LocalUser -Name “JohnDoe”
After you have finished the procedures, PowerShell will remove the account from Windows 11 without deleting any of the associated data.
Would you like to read more about Microsoft Windows-related articles? If so, we invite you to take a look at our other tech topics before you leave!
![]()


