
Boost Windows Productivity with Flow Launcher: Installing the Flow Launcher program is one of the best things you can do if you want to make Windows use more streamlined and efficient for you. Not only does it make it simpler to search for virtually anything, but it also has the potential to make the process of launching applications and software more effective.
Find out how to get the most out of this well-known tool for increasing productivity here.
How to Install Flow Launcher
Instead of going through the Microsoft Store, you will need to go to GitHub in order to download and install the Flow Launcher application. You have the option of using either the installed version or the portable version. For this guide, we will be using the version that has been installed.
- You can get Flow-Launcher-Setup.exe by going to the GitHub page and downloading it. Double-clicking the downloaded file will start the installation process after it has been downloaded.
- Follow the on-screen instructions to install Flow Launcher, making any necessary selections regarding the language, hotkeys, and other options.
- If the hotkey you want to use does not register, this indicates that it is already being used by another program or service. You will have to go with one of the other options.
After finishing the installation, you are almost prepared to start making use of Flow Launcher to perform tasks in a more effective manner.
However, before you do that, you should adjust a few of the settings. Choose Settings by using the context menu that appears when you right-click the Flow Launcher icon in the system tray.
Remove the checkmark from the option in the General tab that says “Hide Flow Launcher when the focus is lost.” This prevents the search box from shutting itself automatically when it is no longer being used. You can continue to conceal and show the box by making use of the shortcut key you set up previously.
As you begin typing, you can adjust the number of results shown in the area below the text input, ranging from the default 5 to a maximum of 17 in certain cases. Opting for eight to ten search results is likely the most efficient approach to accommodate the preferences of the majority of users.
You can also adjust the appearance of Flow Launcher in the Theme tab to make your apps appear in a darker mode if that’s how you like to use them. You can also adjust the width of the window that displays the search results by using the slider.
Last but not least, you may modify the location of the Flow Launcher window’s default opening position by clicking on the frame and dragging it to the desired area. As long as the option to Remember the last launch location is selected, it will remain at this location at all times.
If you are seeking for additional methods to boost your productivity while using Windows, we have some suggestions that may be of assistance to you.
How to Start Applications using the Flow Launcher
Flow Launcher simplifies the process of locating and opening virtually anything, including applications. There is no need to look through the Start Menu app list; simply search for the program, click on it, and it will open.
- Open the Flow Launcher window by pressing the hotkey you chose during setup. If you find this awkward or hard to press, you can change it in the settings.
- Begin typing the name of the app. You shouldn’t need to click in the search box before you type because Flow Launcher will be in focus when opened.
- As soon as you see the required app in the list, you can click it to open it or press the displayed shortcut, e.g. Alt + 2.
How to Conduct a More Efficient Search through your Files
Flow Launcher is an outstanding application for searching your computer. It is able to find everything that Windows Search is able to find, but it displays the results in a manner that is significantly less crowded and significantly more effective.
In order to begin your search, type into the Flow Launcher window. When the results are displayed, an icon is shown next to the title so that it is simple to determine what each result is. It is able to locate apps, files, settings, and photos, among other things. After that, you can either click on the result that you wish to access or press the keyboard shortcut that is provided.
If Flow Launcher is unable to locate a file, software, or configuration on your computer that is a match, it will instead provide you with the option to look for the query on Google. If you do this, your default web browser will create a new tab for the Internet search when you do so.
Within Flow Launcher, there are several different options available to further narrow your search. If you want to find something on a particular website, for instance YouTube David Bowie, you can make your search query more precise by include the name of the website.
- To search your browser bookmarks, start the search query with b. For example: b how to create a workbook in excel.
- If you want to run a Powershell command, type >, followed by the Powershell command. For example: > ping 192.168.1.1.
- You can even use it to perform simple calculations. Type 5*5 to see what 5 multiplied by 5 equals. Other mathematical symbols you can use include + (plus), – (minus), and /(divided by).
- If you want to search in a specific directory, type the directory name between percentage symbols, e.g. %programfiles%\. You will also need to include a trailing backslash.
You can notice a result such as Allow Web Searches Plugin when you first begin using Flow Launcher. This will make a pre-existing plugin within Flow Launcher available for activation. Additionally, other plugins from the store can be downloaded and installed by you.
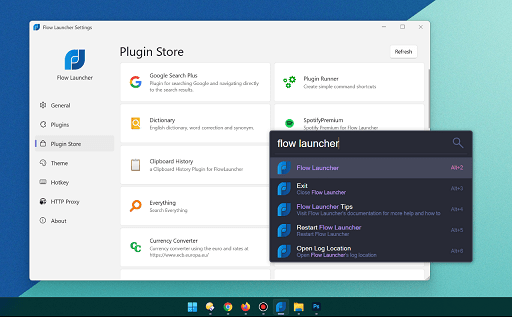
How to Customize Flow Launcher with Plugins to add extra Features
Within Flow Launcher, you’ll find that a number of plugins have already been installed and turned on. In the options, you are free to enable or disable these at any time that suits you. Additionally, other plugins can be readily added in order to expand the functionality of the tool.
- Open the Flow Launcher settings and select the Plugin Store tab.
- Scroll through the list of available plugins to find the one you want to add.
- Click the plugin name and then click the Install button.
- The Flow Launcher window will open with a search for that plugin. Click the result and agree to the installation in the popup message.
- The plugin will be added to the plugin list, where you can enable and disable it as required.
If you have Flow Launcher installed on your personal computer, you may remove it in the same way that you remove any other application. If you require assistance with this matter, please refer to our tutorial that explains how to remove apps from Windows.
It goes without saying that you won’t have to remove Flow Launcher from your computer if you opt to make use of its portable mode. It is recommended that the Portable Manner option be enabled under the options if you are going to be utilizing the program in this mode.
This guarantees that all search data and settings are kept in a single folder, making it portable in the same way as the other data.
Flow Launcher helps you be more productive on Windows
Because Flow Launcher appears to be such a straightforward tool, you might be asking yourself why you require yet another search field.
But if you delve a bit further, you’ll probably notice how strong and useful it can be rather fast. This is an excellent place to start if you are seeking methods to enhance your productivity in Windows 10 or 11, and you may choose either version.
Would you like to read more about boost Windows productivity with Flow Launcher-related articles? If so, we invite you to take a look at our other tech topics before you leave!
![]()


