
How to take a screenshot on Windows 11: It is very helpful to be able to share information, troubleshoots issues, or even just grab a snapshot of something interesting happening in your favorite video game or television show if you know how to take a screenshot on Windows 11.
But regardless of why you want to take a screenshot, Windows 11 provides a number of different options for how you can accomplish this task.
There are a few that are brand new, but the majority of them should be familiar to anyone who is already familiar with how to take screenshots in Windows 10.
How to take a screenshot in Windows 11 with Print Screen
Utilizing Windows 11’s in-built keyboard shortcut is the method that is the quickest and least complicated one for taking a screenshot with no extra bells or whistles.
- Simply hit the Windows key and select Print Screen. Note that you may also need to press the FN key simultaneously if the Print Screen key on your device also performs other functions (this is most common on laptops).
- When a screenshot has been taken, the screen should go dark to let you know that it has been saved. Whatever is currently visible on the screen will be captured in a full-screen PNG image that will be automatically saved.
- Navigate to This PC > Pictures > Screenshots to locate your screenshot(s).
You may also like: Windows 11 Photos app can now save pictures on iCloud
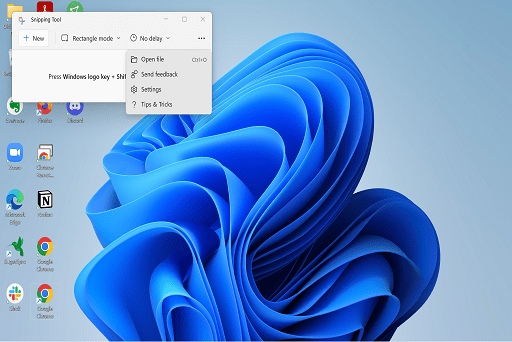
How to take a screenshot in Windows 11 using the Snipping tool
The Snipping Tool is a Windows 10 feature that has been carried over to Windows 11, providing users with a flexible new way to capture screenshots.
Press Shift > Windows Key > S to launch the Snipping tool.
The box that appears at the top of the window gives you a few different options:
- Rectangle Snip: Select this, then use your mouse to draw a rectangular section of the screen you want to screenshot.
- Freeform Snip: Select this, then use your mouse to draw any kind of shape to take a screenshot.
- Window Snip: Select this, then select the particular window on screen that you want to take a screenshot of.
- Fullscreen Snip: Select this to take a screenshot of your entire screen as it appears without the Snipping tool overlay.
After you have taken your screenshot, a notification will appear in the bottom right corner that will give you the option to immediately select the image and edit it, if you so desire. You also have the option of locating the picture by going to This PC > Pictures > Screenshots.
You may also like: Best Windows 11 themes and Skins
How to take a screenshot in Windows 11 using the Xbox Game Bar
Even if you don’t use any of the gaming-focused features that the Xbox Game Bar offers, you can still make use of it as a helpful tool for taking screenshots in Windows 11.
- Press the Windows key + G keys to bring up the Xbox Game Bar.
- Click the 8Screenshot (Camera) icon8 in the top-left within the Capture window. Alternatively, you can press Windows key > Alt > Print Screen.
- You’ll be able to find the image in This PC > Videos > Captures.
Would you like to read more about How to take a screenshot on Windows 11-related articles? If so, we invite you to take a look at our other tech topics before you leave!
![]()


