
How to install Linux Mint on WSL: The Windows Subsystem for Linux (WSL) is a great powerful tool for Windows 10 and Windows 11, it is easily installable distros at hand in the Microsoft Store. It also makes it possible to install other distributions using the built-in WSL tools once you have the right files on hand.
In some cases like Ubuntu, you can install the latest rolling release with an official image. In others, we turn to the WSL community for assistance, and that’s exactly the case for anyone looking to install Linux Mint right now.
The project hosted on GitHub should be giving appreciated here. If not, installing Linux Mint onto WSL is a breeze, and furthermore, it’s already on the latest version, Linux Mint 20.3.
Install Linux Mint on WSL for Windows 11 and Windows 10
Linux Mint is an Ubuntu-based Linux distribution and is certainly one of the more mainstream options out there, often considered as a perfect place for Windows converts to begin. Of course, using Linux in WSL is a little different from just loading it up on a PC, but if you need it or just want it, you can have it.
However, if you want to use it on WSL, you need to use an excellent community project called LinuxmintWSL. This is hosted at GitHub, so the first port of call is to load up its repository. It is also only built for WSL 2. It does, however, support both Intel/AMD and ARM machines, so Windows on ARM users are not left out.
You may also like A Step-by-Step Guide on How to Create Partitions in Windows 11/10
To get started, on the GitHub repository, hit the releases page and download the latest package. Once downloaded, extract the zip file to the directory you want to run it from, then simply run Mint.exe. Unlike installing Ubuntu’s latest releases from one of the official images, this has been bundled up to resemble more the distros you would download from the Microsoft Store.
It will take a few seconds or longer time, depending on your hardware to run its installation, but the installer does not require any interaction from you. It will open a terminal window and when completed, you will be asked to press Enter. The terminal window will then close.
If you use Windows Terminal, Mint will now show in the dropdown menu to launch the next time you load it up. If you don’t, you can launch it through PowerShell the same as any other Linux distro with this command:
wsl -d Mint
How to set up Linux Mint on WSL
Enter Mint in your terminal using one of the methods described above. You will be presented with a basic prompt that begins with root@. As with any other Linux distro on WSL, you will want to add a user to Mint with the right permissions before doing anything. You don’t have a password, either, so you will need to add one of those before beginning.
In the terminal enter:
passwd
Follow the prompts to set a root password. Next, you will add a user with:
useradd -m <username>
And then you will follow that up with a password for the user with:
passwd <username>
Again, follow the prompts to add your password. These commands have added a root password, a user, and a user password.
The next step is to add the right permissions to your user to be able to use the sudo command, otherwise, the result will be an error. We can do this by entering:
usermod -aG sudo <yourusername>
You can then switch to your user with:
su <username>
The next thing to do is to ensure that when you launch Mint if you want to be useful and not root (which is advisable), you configure it so you don’t have to manually do it every time. There are two ways to do this, the first is with the wsl.conf file and the second is by configuring Windows Terminal if you use that.
You may also like Windows 11.1 Download: What Is The First Impression
You won’t have a wsl.conf file when you first set up Linux Mint, so you will need to create that and enter the right settings. As we are going to be inside the /etc/ directory it’s easiest to be root for this one. In the terminal as root enter:
nano /etc/wsl.conf
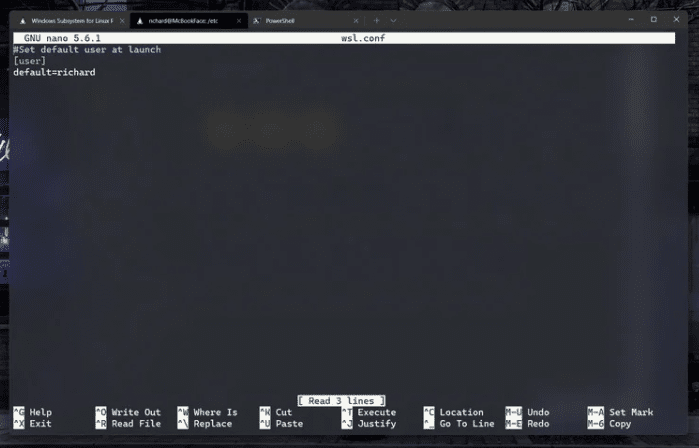
The Nano text editor will now open with a new blank file. Enter this block into the file:
# Set the user when launching a distribution with WSL.
[user]
default=YourUserName
Hit Ctrl + X followed by Y and then Enter to save and exit. Close down your Linux Mint instance, wait a few seconds (eight is the official line from Microsoft), and then when you relaunch you should be ready to go, already logged in as a user.
Alternatively, if you are using Windows Terminal, open the Settings, find your Linux Mint install in the sidebar, and then in the command line box ensure this command is stored:
wsl.exe -d <distroname> -u <yourusername>
This will have the same effect once closed down and restarted. Setting up a wsl.conf file is preferable, though, as it ensures you’re always entering as a user. If you use the Windows Terminal settings and you load up Linux Mint via PowerShell, you’ll be taken in as root.
You may also like Windows 11 Microsoft: Tips and Tricks
That’s all there is to it. Linux Mint is now set up on WSL for you to use just like any other you would install through the Microsoft Store. You may find some GUI apps that have appeared in your Start menu as well that come with the standard installation of Linux Mint, but those can all be removed if you don’t want them (and the chances are you don’t).
Additionally, you can run multiple instances of Linux Mint on WSL. For each subsequent installation, simply change the name of the Mint.exe file from the top of this guide to something else, then run it again. The new instance will be set up with the changed file name.
Would you like to read more WSL-related articles? If so, we invite you to take a look at our other tech topics before you leave!
Use our Internet marketing service to help you rank on the first page of SERP
![]()


