
How to Create Partitions in Windows 11: If you are using a new Windows system, the installer perceives your hard drive as unallocated space. All the data is saved in this space by default. If the system gets corrupted, then all the data will be lost. To avoid this, you need to segment the hard drive so that the operating system knows where to save the data.
This process of segmentation is known as partitioning. This partition when formatted with a typical file system is known as volume.

Advantages of Disk Partitioning
Following are a few advantages of disk partitioning:
- If any of the partitions get corrupted, you can delete that particular partition and ensure the safety of the rest of the data on the system.
- Every partition on your Windows system operates as an independent system. So, you can run more than one operating system on the system.
- You can allocate specific system space for specific data.
- Disk partitions enable better storage space and data management.
You may also like: Windows 11 vs Windows 10: All You Need To Know
How to Create Partition in Windows 10 & 11?
There are several ways to create partitions in Windows 11. You can use the built-in default option in Windows 11 to create and manage partitions in the hard disk or you can use software for the task.
You can create a partition in Windows 10 and 11 by using the built-in Disk Management feature.
- Shrink the Partition: If your current system has a single HDD or SSD, it will consume a lot of space. You need to clean the space by shrinking the partition. Follow these steps:
- Close all applications on your system.
- Next, right-click on the Windows start menu and select Computer Management.
- Click on Storage > Disk Management.
- Locate the partition that you would like to shrink and choose “Shrink Volume”.
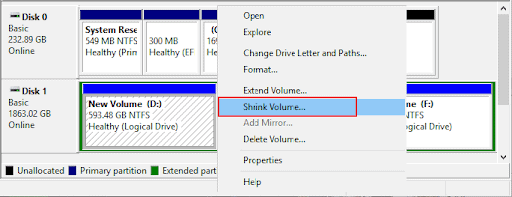
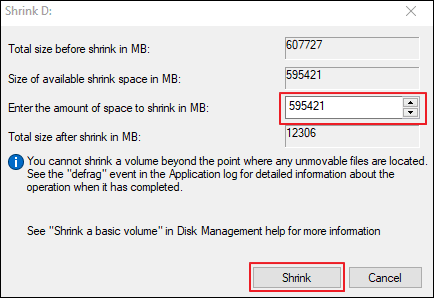
- In the Shrink window, enter the amount of space to shrink in MB and press the “Shrink” button.
When the shrinking finishes, you will see unallocated space against the drive. This indicates that the disk volume has been reduced and is available for partitioning.
- Extend the Partition of Hard Drive: It is always better to shrink the partition next to the partition that you would like to extend. Here are the steps to extend the partition in the hard drive.
-
-
- Locate the partition and click on Extend Volume.
-
- Click on “Next” to continue and then click “Finish” to complete the process.
- Create Partition in Windows 11: Here are the steps to create a partition in Windows 11.
- Select the “New Simple Volume” by right-clicking on the unallocated space.
- In the New Simple Volume Wizard that opens, enter Simple Volume Size in MB and click on the Next.
- Choose the desired drive letter and click on Accept.
- Click on Next. The dialog box for Format Partition will appear on your screen.
- Choose to Perform a Quick Format and click on the Next option.
- Click on Finish to complete the process.
- Delete Partition: Many times, extra partitions on your system can cause security issues. To avoid them, you can delete the partitions. Follow these steps.
-
- Locate the partition you want to delete and right-click on it to see the option – Delete Volume.
- Choose this option and click on Yes to continue.
You may also like: Download Windows 11 SE Wallpaper
Note: Deleting the partition can also delete the data that was present on the partition. It is always recommended to take a backup of all the data before deleting the partition. If you delete a partition without taking the backup, you can still retrieve the data using third-party software like Stellar Data Recovery Professional, TestDisk Data Recovery, Recuva, etc. This software retrieves data from lost or deleted partitions, formatted drives, and unbootable and completely crashed systems. It can recover files from SSDs, HDDs, USB drives, 4K, and optical media devices. The application is compatible with the latest Windows 11 OS and earlier versions.
Conclusion
Disk partitioning leads to effective use of storage space on your system. It helps improve performance and assures better usage of system resources. These partitions can be shrunk, extended, created, and deleted to optimize the system performance.
Though these activities can be easily performed using the Disk Management feature, the risk of data loss is always high. In case you suffer data loss, you can use reliable professional data recovery software that will help you to recover deleted, formatted, and lost partition data without any constraints.
Would you like to read more Windows 11-related articles? If so, we invite you to take a look at our other tech topics before you leave!
![]()


