
When you download a Microsoft Windows 10 or Windows 8 ISO file via the Media Creation Tool, you will realize that there is an install.esd file under the sources folder (X:Sourceinstall.esd). This install.esd file is a compressed and encrypted file that contains a full copy of the Windows operating system in a protecting container.
In this guide, we are going to explain how to convert install.esd to install.wim.
This install.esd file can be used as a file for repairing source when you are using the DISM command-line tool with the /Source switch to repair Windows 10 or Windows 8/8.1.
- DISM /Online /Cleanup-Image /RestoreHealth /Source:ESD:X:Sourcesinstall.esd
Unfortunately, many users still complained that even by using the correct install.esd file, the DISM tool could not find the source files required for the repair of Windows 10 or Windows 8/8.1.
After a series of tests carried out, we realized that the DISM could not find the source files error and this happened because, in the latest versions of Windows, the install.esd file can contain multiple Windows 10 images (install.wim files), for several Windows versions (e.g. Windows 10 Pro, Windows 10 Home, etc.). So DISM could not find the correct files required to repair Windows.
In this guide, you can find detailed instructions on how to extract install.esd file, in order to get the correct install.wim file, needed to repair Windows 10 or Windows 8/8.1 (Export Install.WIM from Install.ESD)
How to Convert install.esd to install.wim (Windows 10/8)
1. From the Windows installation media, copy the install.esd file from the “sources” folder (e.g. X:sourcesinstall.esd) to the root folder of drive C: *
Please note: If you are using an ISO Image file, then what you need to do is, mount it to Windows before the installation and if you are using Windows 8/8.1, then read this article: Download Windows 10 1511 ISO and Create USB Installation Media
3. Right click Start menu and select Command Prompt (Admin).
4. Type cd to go to the root folder of drive C:
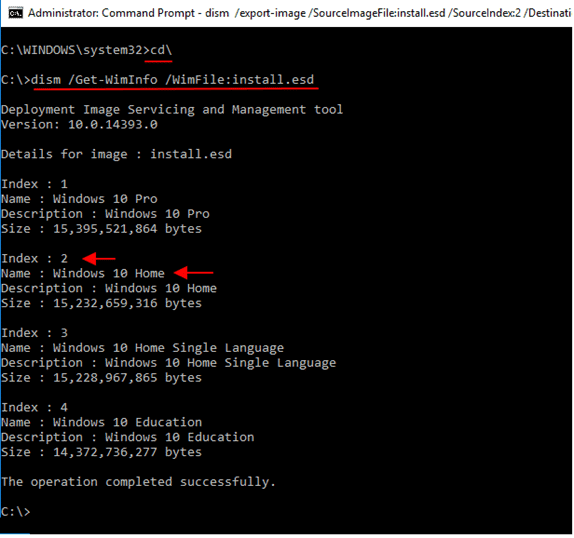
5. Then type the following command and press Enter, to find which images are in the “install.esd” file:
- dism /Get-WimInfo /WimFile:install.esd
6. According to your Windows 10 installed version, take note of the index number. *
* e.g.: If you have installed the Windows 10 Home edition on your system, then the Index number is “2”.
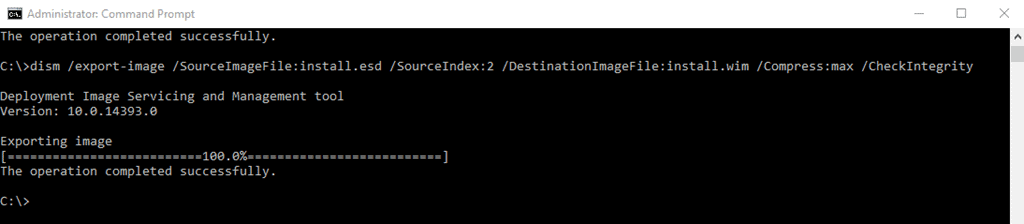
7. After that, use the command below to extract the corresponding to your Windows version “install.wim” file (Index number): *
- dism /export-image /SourceImageFile:install.esd /SourceIndex:IndexNumber /DestinationImageFile:install.wim /Compress:max /CheckIntegrity
Please notes:
1. You need to replace the IndexNumber according to your Windows 10 installed version.
e.g. For instant, if you are using Windows 10 Home based computer and you want to extract the install.wim file with Index number=2. Then, the command will be:
- dism /export-image /SourceImageFile:install.esd /SourceIndex:2 /DestinationImageFile:install.wim /Compress:max /CheckIntegrity

2. And if you still receive the “Error 11, then there was an attempt, made to load a program with an incorrect format” after running the above command. All you need to do is change the /Compress argument* from “max” to “fast” or to “none” or to “recovery”.
Convert Install.ESD to Install.WIM
* The /Compress argument is the type of compression used for the initial capture operation. The maximum option provides the best compression but takes more time to capture the image. The fast option provides faster image compression, but the resulting files are larger than those compressed by using the maximum option. This is also the default compression type that is used if you do not specify the argument.
You can use the recovery option to export push-button reset images. The resulting files are much smaller in size, which in turn, greatly reduces the amount of disk space needed for saving the push-button reset image on a recovery drive. The destination file must be specified with a .esd extension. The none option does not compress the captured image at all.
7. When the process is completed you should have the exported install.wim on the drive C: (C:install.wim).
That’s all about how to convert install.esd to install.wim and hope we were able to help with this token.
Would you like to read more about Windows-related articles? If so, we invite you to take a look at our other tech topics before you leave!
![]()


