React Native Push Notifications: Mostly every business owner is utilizing the latest push notifications marketing strategy which literally brings a strong impact on your users’ minds that eventually increases your business app engagements.
When this happens, it further helps you in increasing your conversion rate and customer retention rate as well. That’s why most business persons these days are creating their business mobile apps so that they can directly pitch their customers and make them aware of their brands.
So, with the help of these push notifications, most business organizations are getting the results that they have always wanted. If you are a business person, then you can also get the same benefit as others by implementing these React Native push notifications in your iOS and Android business apps.
Now, if you are thinking about how to set up these React Native Push Notifications with your business applications, then you don’t need to worry because this is an easy procedure that is hardly going to take 20 minutes.
Here, I am going to provide the complete guide by which you can easily install these react-native push notifications to your iOS and Android app versions. But before that, let’s have a quick look at the essential requirements that you need to have with you.
Key Requirements
Following are the required elements that you will need for both iOS and Android as well:
- Node.js – JavaScript
- V8-3 (v8.3) or other relevant secondary versions
- React Native Version 0.60 (react-native >= 0.60.0)
Further, you will need some separate elements, each for iOS and Android versions, which are mentioned below:
For Android Platform:
- Pre-installed upgraded Google Play Services version in any Android device, either it’s a mobile or a tab.
- Already set up a Firebase account.
- Official Android Integrated Development Environment (IDE)—Android Studio
For iOS Platform:
- An upgraded iOS device, either an iPhone or an iPad.
- Push Certificate for iOS
- Apple’s Integrated Development Environment (IDE)—Xcode
Apart from these, you must have the updated version of the SDK (Software Development Kit), which is 2.
Now, if you are all set with the pre-requirements then you can start the implementing procedure with iOS as well as Android.
Step 1: Start with the New Project
Here, start with creating a new project on WonderPush.
And then pick Android or iOS accordingly.
Now, if you already have the project created with Wonderpush, then simply add Android or iOS to any ongoing project by making a few changes in settings.
Step 2: Add the Credentials
For your Android system, you need to add your Firebase account here. To do this, follow the steps below:
- First of all, you need to find the server key, which you need to copy. Along with that, you will also need to find your sender ID. You are going to find all these in the Firebase Cloud settings, where you can simply click on the project settings and then choose the cloud messaging tab.
- Then land on the dashboard page by WonderPush. Here you will find the settings page where you need to click the ‘platforms’ and then simply choose “Android Application.”
- After this, you can paste the ‘Server Key’ that you copied earlier.
- Then finally click on the Save button.
By doing this, you will be able to save your Android credentials.
Now if you are looking to set up credentials for the iOS platform, then here you will be required to upload your push certificate, which you can easily do by following the steps below:
- First of all, locate the settings option.
- Choose platforms.
- Then click on the iOS application.
- After choosing this, you will be asked to fill up the given details. On this page, first, upload your push certificate by hitting the Browse button.
- On the same page, you will be asked to fill in the password, which will be optional for you. So, you can fill this in also if you know the appropriate password.
After this, make sure that you have configured the sandbox and production as well.
Step 3: Implement SDK (Software Development Kit)
Here you need to start coding your React Native business app, then add on the React Native SDK by WonderPush.
Now for iOS, you will be additionally required to add the device capabilities and notification service extension as well.
For adding device capabilities:
First, choose the signing and capabilities, then click on ‘+capabilities,’ where you can add push notifications and background modes as device capabilities.
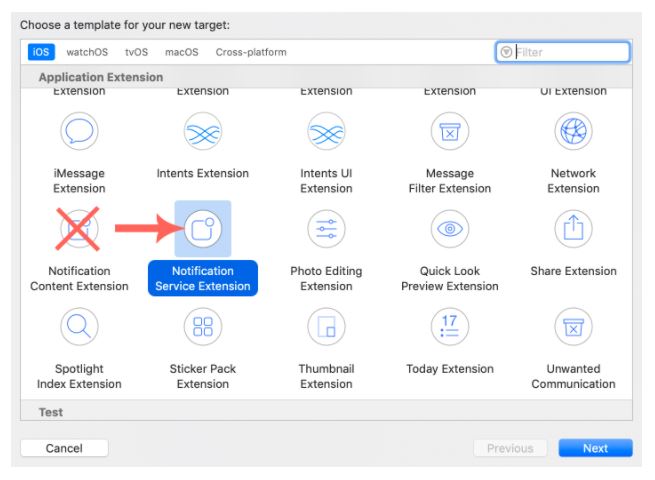
For adding the notification service extension:
- Go to your Xcode.
- Choose File.
- Then select Target.
- And finally, click on ‘Notification Service Extension,’ where you can add ‘WonderPushNotificationServiceExtension’ as your target name.
Step 4: Set Up the Appropriate Code
- Go to the settings page, then choose platforms.
- Here you need to note down your Client ID and password as well.
Now, you need to add the appropriate code for your users, which will allow them to subscribe to receive these React Native push notifications from your business app.
So, for different platforms, you need to set this code in different ways:
For Android Platform:
To set up this code, you need to open the official Android Integrated Development Environment, i.e., Android Studio, and configure this with the Android Software Development Kit by WonderPush.
For iOS Platform:
Now to set up this code in iOS, you need to open Apple’s Integrated Development Environment, i.e., XCode, then add your client’s ID and password, which you have noted from the above, and you are all done.
Conclusion
Here we have provided the complete details about setting up the React Native push notifications on different platforms, i.e., iOS and Android. So, follow the above-given instructions and implement this push notification strategy along with your business app and grow your business.
Would you like to read more about React Native Push Notifications-related articles? If so, we invite you to take a look at our other tech topics before you leave!
![]()


