BIOS Settings: A stutter in an inappropriate place and time can completely ruin an otherwise breathtaking setting or intense action sequence in a video game. Even if you run diagnostics on your hardware until the sun goes down, you might still find yourself tearing your hair out in frustration.
Having said that, the stuttering issue might be able to be resolved in the BIOS of your personal computer. Find out how to do it with me.
What is it that the BIOS does?
The basic input/output system, also known as BIOS, is a program that is executed whenever your personal computer is powered on. In our breakdown of the BIOS, we covered how it ensures that your personal computer operates as it was designed to. Additionally, it carries out a number of other tasks that are essential to the proper operation of your computer. It is essential to keep in mind that the BIOS is stored on a physical chip that is located on the motherboard. A ROM chip or a BIOS chip is what you need to replace this.
You are also able to fine-tune certain of your computer’s settings using the most contemporary BIOS. Overclocking, power management, fan management, and other optimization techniques are included here. If you aren’t careful, some of these settings could potentially cause you to stammer, while others could help you prevent stuttering in the future!
Learn how to access the BIOS on your Windows computer if you are not already familiar with how to do so before continuing.
Extreme Memory Profiling, Number One
If you have a central processing unit (CPU) made by Intel, you have the ability to overclock your random access memory (RAM) thanks to a feature called Extreme Memory Profiling, sometimes known as XMP. If you are not familiar with RAM, this is the component in your computer that is responsible for storing information that has to be used fast. If you want to learn more about RAM, check out this article. In our explanation of why you need XMP to operate RAM at maximum speed, we go into more detail about each individual point.
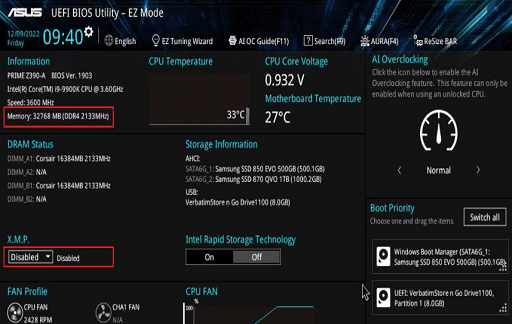
As a point of comparison, we utilized the Intel i9 9900k CPU alongside the Corsair Vengeance RGB Pro RAM. When XMP is disabled, the RAM only operates at a frequency of 2133MHz, despite the fact that its rated frequency is 3600MHz. This can be seen in the image that is located above. This is due to the fact that the RAM on the motherboard is being run at the factory default frequency for its generation.
In this particular scenario, the Vengeance RGB Pro RAM from Corsair is of the DDR4 generation, which has a frequency of 2133 MHz by default. When we turned on XMP, there was a significant increase in frequency. XMP achieves this by loading profiles that have been previously saved on your RAM. These profiles include control over a range of RAM settings, including the frequency and timings, which enables the RAM to operate at the frequency that is specified by the manufacturer.
It is possible that the stuttering you are seeing in your games is due to the fact that your RAM is not operating at the frequency specified by the manufacturer. If you want to fix this issue, go into your BIOS and turn on the XMP feature, then check to see if the stuttering problem is still present. It is important to note that AMD possesses its very own XMP counterpart that performs identical functions. This configuration is referred to as the Direct Overclock Profile on ASUS motherboards (DOCP).
BIOS Settings: RAM Timings
Timings for RAM are shown as a series of numbers, and they differ from one RAM model to the next. These numbers represent the number of clock cycles that must pass before an operation can be carried out by the RAM. When it comes to gaming, your RAM will pull the necessary game data from your hard drive or solid-state drive (HDD or SSD) and then retrieve it when it’s needed. The more precise your timings are, the more quickly your RAM will do this task.
However, if the RAM timings are configured wrong, this can lead to the instability of the system. For instance, the timings for Corsair’s Vengeance RGB Pro RAM are preconfigured to be 18-22-22-42 by default. For the purpose of this illustration, the RAM timings were configured to be 22-15-15-36 on the ASUS PRIME Z390-A Pro motherboard.
The RAM’s rated timings are substantially laxer compared to these timings, which are significantly tighter. Shortly after loading into Windows 11, the user experienced a Blue Screen of Death (BSOD). Having said that, incorrect timing does not necessarily result in a crashed computer. If the timings of your RAM are just a hair too tight, you will experience issues like stuttering, which are not as obvious as other problems.
On the other hand, the opposite is also true. Stuttering may result if the timings of your RAM are set too loosely, as this will require extra clock cycles to accomplish an operation on your RAM. So, what exactly is the answer? In most instances, XMP will load the timings that are specified for a RAM’s rated speed. In the event that this does not fix the stuttering, you will need to manually modify the timings of your RAM.
You may typically find these printed on the box that your RAM arrived in. Installing CPU-Z, which will display the precise timings that are being used by your RAM at the moment, is another alternative that comes highly recommended by our team.
Trusted Platform Module (TPM)
If you are still having issues with stuttering in games, it is possible that the Trusted Platform Module (TPM) on your computer is to blame. TPM is a physical chip that is installed on the motherboard of your personal computer that provides an additional layer of security. If the chip detects any kind of unauthorized activity, the computer simply will not boot up.
However, a TPM is not pre-installed on every single personal computer. Intel and AMD have developed their own version of a technology called Platform Trust Technology (PTT) and Firmware Trusted Platform Module (fTPM) to get around this problem. These platforms are capable of performing the same functions as a TPM but without the need for additional hardware on a PC.
fTPM has been known to cause stuttering on AM4 Ryzen systems, despite the fact that both solutions perform in a comparable manner. The fTPM for AMD is saved in the chip that serves as the motherboard’s BIOS. Memory transactions between the fTPM and BIOS chip were causing stuttering and latency on Windows 10 and Windows 11 Ryzen PCs, according to AMD and a number of user accounts.
Since then, AMD has released a remedy for this issue, but in order to use it, you will need to upgrade your BIOS. It is essential to take into consideration the fact that the stutters created by my fTPM also interfere with the audio. If you have a Ryzen-based system and are experiencing problems that are similar to those described here, changing your BIOS may help. If the problem continues to occur, AMD suggests turning off fTPM in the system’s BIOS as a possible fix.
You can choose from a few different solutions to fix stuttering in PC Games
When attempting to eliminate stuttering in your games, specific XMP, RAM timings, and TPM BIOS settings are absolutely crucial to take into consideration. They are a significant factor in determining how your computer communicates with its hardware and how the hardware communicates with your computer. On the other hand, these aren’t the only possible solutions that can be found! Keep digging, and you might just find the answer you’re looking for.
Would you like to read more about BIOS Settings-related articles? If so, we invite you to take a look at our other tech topics before you leave!
![]()