Mac Troubleshooting Tips: Mac systems are considered the most reliable systems, but they also often encounter problems. Sometimes, Mac users face issues, such as the hard drive being slow, the hard drive is not visible, or even a hard drive failure.
In this post, we will discuss such issues and learn how to fix them. Also, we’ll discuss some tips to avoid hard drive failure on Mac.
How to Avoid Mac Hard Drive Failure?
Below, we will discuss the issues that may lead to hard drive failure, their causes, and the solutions to fix them. It is advised that you should first backup your data on iCloud or by using Time Machine.
Slow Running Mac Drive
The prolonged usage, scarcity of free storage space, and/or logical errors result in the slowing down of the Mac startup disk. If this is not addressed immediately, it may cause disk failure.
How to Fix it?
- Delete unwanted items and duplicate files/folders to free up space on the hard disk.
- Delete login details saved on your system if they are no more needed.
- Remove large files and apps if not required.
- Withdraw access to background activity from apps that are no longer useful.
- Upgrade the Mac hardware and firmware.
- Repair startup disk with Disk Utility.
- Update your macOS and third-party applications.
- Get rid of inessential plugins, cache, etc.
Hard Drive Not Visible in Disk Utility
If your hard drive is not showing up in the Disk Utility, it doesn’t always mean that your hard drive has crashed. If the hard drive is greyed out, you can try to mount it to fix the issue.
How to fix it?
- Select the greyed Mac hard drive in Disk Utility.
- Click on the ‘Mount’ button in the taskbar.

- Your hard disk will be mounted and ready to use.
‘Disk Utility can’t repair this disk’ Error
Disk Utility ‘First Aid’ is used to repair hard drives for logical errors, bad sectors, etc. But sometimes when trying to repair the hard drive, the ‘Disk Utility can’t repair this disk’ error message is displayed.
How to fix it?
- Switch on your Mac and press and hold Command + S keys to boot your Mac into Single User Mode.
- Insert command ‘fsck -fy’ in the Command Prompt and press Return.
- The ‘File System was Modified’ message appears. If not, then again enter the above command and press ‘Return’.

- Keep inserting the command ‘fsck -fy’ until you see the above message or ‘The volume Macintosh HD appears to be OK’ message.
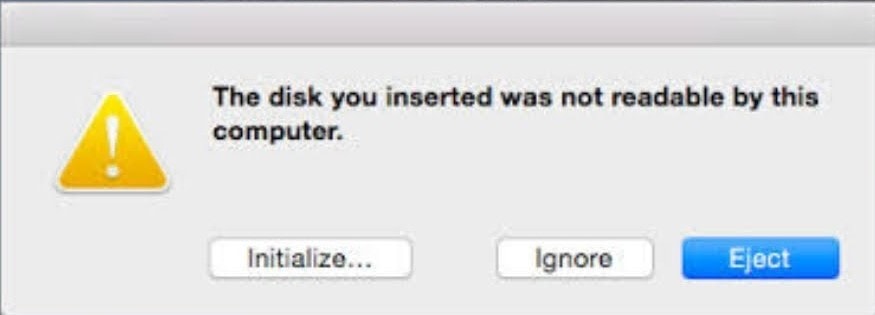
External Hard Drive not Mounting/ Unreadable/ Unrecognized
In general, when we connect an external hard drive to the Mac, it appears on the Desktop as well as the Finder. But sometimes, the drive fails to mount, becomes unreadable, or the system renders it unrecognized. This happens due to bad sectors in the drive or faulty USB connection. If not addressed, it may aggravate the issue further.
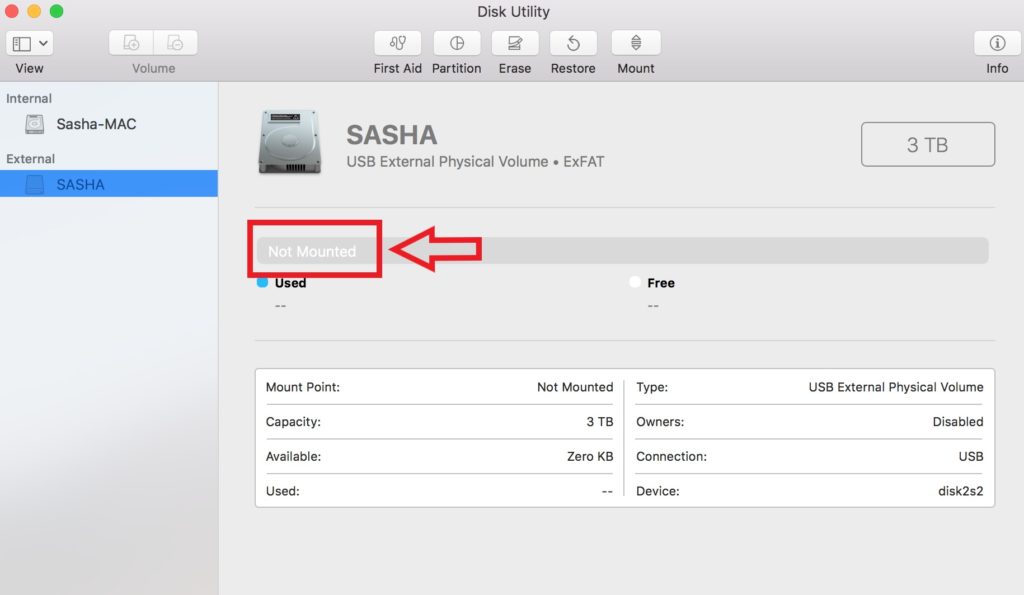
How to fix it?
- Replace the USB cable used to connect the hard drive to Mac.
- Connect the hard drive to another USB port.
- Unplug and re-plug the external hard drive.
- Check the external hard drive on some other Mac system.
If none of the above fixes works, it indicates that there are some severe issues with your external hard drive. Immediately try to take the backup of the drive with Disk Utility.
Note: If you are not able to take backup through Disk Utility, you can opt for Stellar Data Recovery Professional for Mac software to recover data from the troubled hard drive.
Lack of Storage Space on Mac Hard Drive
If the message ‘Your startup disk is almost full’ keeps on appearing on your Mac, you need to delete some data to free up some space.

How to fix it?
Remove caches:
- Launch ‘Finder’ from Dock.
- Click ‘Go’ on the Menu Bar and then click ‘Home’.
- Click the ‘Cog Wheel’ icon on the top and select ‘Show View Options’ from the dropdown menu.
- Check the ‘Show Library Folder’ in the pop-up window and close it.
- Open the ‘Library’ folder.
- Click the ‘Caches’ folder and select all using Command + A.
- Click ‘Delete’ on your keyboard and then empty the Trash.
Remove temporary files, logs, application support files, and other unnecessary data.
- In the ‘Library’ folder, find all the unnecessary files, folders, iTunes files, etc.
- Select all or an individual file and press ‘Delete’ on the keyboard.
- Once you are done deleting all the unnecessary data, open the Trash.
- Select ‘Empty Trash’ to free up space on your Mac.
Note: You can use a third-party file eraser software, like BitRaser File Eraser to permanently erase unnecessary data from your Mac’s hard drive.
You may also like Reasons to buy 13-inch MacBook Pro instead of the MacBook Air
Mac Hard Drive making Clicking Noise
The clicking noise emerges due to physical damage caused to your hard drive. For example, the Mac hard drive platter may have got damaged due to jerk or accidental falling. In this situation, you cannot do much to fix it except saving the data.
How to fix it?
- Take a backup of the Mac hard drive data immediately.
- Run Apple Hardware Test.

Note: If it is not possible to take a backup of Mac Hard Drive, then clone the drive using the disk imaging feature of Disk Utility.
Do not attempt to repair the damaged hard drive on your own. Instead, get it checked by an expert, and if need be, replace it with a new Mac hard drive.
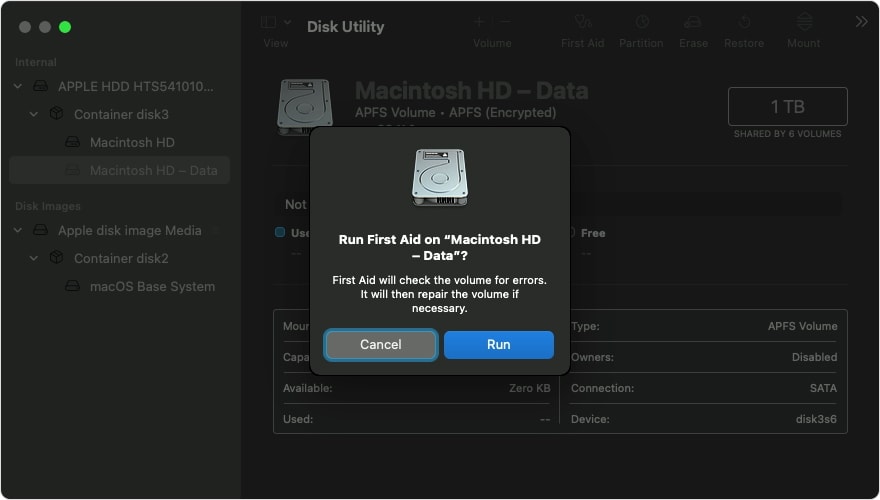
Bad Sectors on Mac Hard Drive
If some data stored on the Mac hard drive suddenly goes missing or the drive displays error while opening a file/folder, it might be because the hard drive has developed bad sectors.
How to fix it?
- Open ‘Disk Utility’ and check the S.M.A.R.T. status of the concerned hard drive.
- Now boot the Mac into macOS Recovery Mode.
- Again open ‘Disk Utility’.
- Select ‘First Aid’ and click ‘Run’ to repair the hard drive.
- Repeatedly run the First Aid on hard drive until it displays no errors.
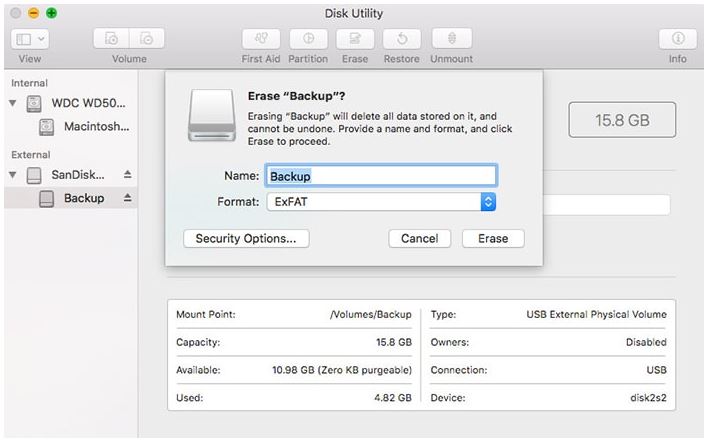
Note: If the repair doesn’t work, backup the data on your drive. Erase the drive and then restore the backup.
Mac External Hard Drive keeps Ejecting
When you try to replace the CD/DVD drive in the Mac system with a hard drive to increase the storage capacity, the hard drive keeps auto ejecting in some cases. It happens because the power management settings for CD/DVD drive and Mac hard drive are different.
How to fix it?
- Launch ‘Finder’ from Dock and click ‘Applications’.
- Select ‘Utilities’ and then ‘Terminal’.
- Type ‘pmset –g | grep disksleep’ in the Terminal and click ‘Return’.
- Check the value of disksleep and increase it if it is low.
- Insert ‘sudo pmset –a disksleep X’ and click ‘Return’ (Replace X with suitable number).
- Enter the Admin password when prompted.
Note: To check the changed sleep time value, insert ‘pmset –g | grep disksleep’ in the Terminal again and hit ‘Return’.
Not Able to Find Files on Mac Hard Drive
If some files are hidden or present in the hidden Library folder, you may not able to see them. It might also happen that you have accidentally deleted the files.
You may also like Best Windows Tablets for 2022
How to fix it?
- Go to the Finder location and press Command + Shift + . (dot) to unhide the hidden files and folders.
- Open the Trash and look for the missing files.
- Access the Finder location and open Time Machine and Enter Time Machine to locate the file/folder.
- If you are confirmed that the file has somehow been deleted, then use Mac file recovery software to recover your lost files/folders.
Mac External Hard Drive Automatically goes to Sleep Mode
When the external hard drive is left idle for some time, the macOS turns off the hard drive motor to save power and puts the hard drive into sleep mode.
How to fix it?
- Click the ‘Apple Menu’ button on the top left.
- Select ‘System Preferences’.
- Click on the ‘Energy Saver’ option.
- In the Energy Saver window, uncheck the ‘Put hard disk to sleep when possible’ checkbox.

Note: This option does not affect the SSDs as they have no moving parts.
To Wrap Up
A Mac hard drive may get failed due to various reasons – logical or physical. However, you can avoid the failure of a hard drive by following the troubleshooting methods mentioned in this post. Before performing the troubleshooting methods, take a backup of the Mac hard drive data. In case you’ve lost the data, you can use professional data recovery software, such as Stellar Data Recovery for Mac to recover the data.
Would you like to read more about Mac Troubleshooting Tips-related articles? If so, we invite you to take a look at our other tech topics before you leave!
![]()