How to set up eSIM on an iPhone: Setting up a second line on your iPhone is a great way to help you keep everything separate, whether you’re traveling abroad and trying to avoid roaming charges or simply looking for a better way to manage your work-life balance.
This capability debuted with the iPhone XS and iPhone XR in 2018, but it wasn’t obvious because, unless you lived in China, the iPhone didn’t have a second SIM card slot. Instead, you had to use an eSIM to activate the second line. While eSIM technology isn’t entirely new, Apple has been using it with the iPad since 2016; mobile carriers have taken a little longer to catch up.
The good news is that you can now get an eSIM from almost any carrier in North America, and quite a few others around the world. Indeed, eSIM support is now so widespread in the United States that Apple has dropped the physical SIM card slot entirely from the iPhone 14 lineup. Instead, the iPhone 14 comes with two built-in eSIM cards.
Whether you’re using a brand-new iPhone 14 Pro Max or a 4-year-old iPhone XR, adding a second line to your iPhone is simple, whether it’s just for a short trip or for business purposes.
Getting an eSIM is the most integrated way to add a second line to your iPhone, as it provides both voice and cellular data capabilities. However, it is not the only option. If you simply want an extra phone number for making voice calls, several simple apps are available. Just keep in mind that all of these require a data connection, either via Wi-Fi or your existing cellular plan. These are essentially VoIP services rather than traditional second lines.
How to Get an eSIM Card
The first step is to ensure that the carrier with which you want to set up a second line supports eSIM technology. Apple provides a helpful list, but it’s always a good idea to double-check with your mobile provider’s customer service department.
Even though an eSIM does not require a physical SIM card, you will still need some information from the mobile operator you wish to use. Normally, this is a QR code that you can scan with your iPhone camera, but unfortunately, many carriers still provide this code on paper. If this is the case, you may still need to go to a store or wait for it to arrive in the mail.
The good news is that as eSIM technology becomes more widely available, this is rapidly changing. Verizon can now activate an eSIM over the phone, and T-Mobile has gone so far as to offer an app to make it easier for prepaid customers to activate an eSIM.
If you’re creating an eSIM account online, your carrier will most likely request some information from your iPhone, such as the IMEI2 and EID numbers, or use IMEI Check. Here’s how to locate them.
- On your iPhone, open the Settings app.
- Select General.
- Select About. Your EID can be found in the section that includes your Wi-Fi address and Bluetooth address. Your IMEI2 will be further down, below the information for your current carrier.
- Copy either of these numbers to the clipboard and paste them into an email, text message, or online form. To do so, select and hold the field until the Copy button appears, then click on it.
You can also read: What is an eSIM Card
How to set up an eSIM via QR code
Once you’ve set up your eSIM account with your carrier, they should send you a QR code to scan in order to add the new line to your iPhone. If you received your eSIM QR code electronically, you’ll need a second screen to display it on, such as your Mac, PC, or tablet, because it must be scanned with your iPhone camera. Here’s where you can do it:
- On your iPhone, open the Settings app.
- Select Cellular. You’ll see your cellular data settings for your current plan.
- Select the Add eSIM button below this. Note that this option may be labeled Add cellular plan on older versions of iOS.
- If you’re using iOS 16 or later, a Set Up Cellular screen will appear. Choose Use QR code. On older iOS versions, you’ll be taken straight to the next screen.
- The iPhone camera will begin to function. Place your QR code in the frame and hold it there for a few seconds. When your iPhone recognizes the QR code, it should proceed to the next screen, informing you that a new cellular plan from your carrier is ready to be added to your iPhone.
If you were given a series of written codes rather than a QR code, you can enter this information manually by selecting Enter details manually at the bottom of the screen.
- On the “Activate eSIM” screen, confirm that you want to activate the plan associated with the QR code that you just scanned by selecting Continue. On versions before iOS 16, this may also read Add cellular plan.
- Select Done when you see “Cellular setup complete”.
- On the following screen, you’ll be prompted to assign labels to each of your plans. This is how you will differentiate them when receiving calls or selecting a specific line for placing calls or sending text messages.
Your current number will be labeled “Primary,” but you can change this if a different labeling system, such as Personal and Business, makes more sense. If you’re not sure which labels to use here, don’t worry; you can easily change them later.
- Select the label you would like to change, and select one of the predefined labels or choose Custom label and enter your own.
- After picking a label, select Done in the top-left corner.
- If you want to change the label for the other line, repeat steps 9 and 10. When you’re finished with your options, click Continue to proceed.
- On the next screen, select which of your two lines will be used for outgoing calls and messages. While you will be able to choose a different line for each call or contact, the one you choose here will be the default.
Choose the line you would like to use as your default line, and then select Continue.
- Next, choose the numbers you want to use for iMessage and FaceTime. This has no effect on which line your iPhone uses to send and receive data for these services; it still uses Wi-Fi or your default cellular data plan (which you’ll select in the next step), just like any other service on your iPhone. All you’re doing here is deciding which of your phone numbers others can call you on via iMessage or FaceTime.
When you’re ready, select Continue after selecting one or both lines.
- The final step is to decide which cellular data plan you want to use. The best option here will be determined by factors such as data rates, allocations, and coverage. You can change this later, as you can with everything else in these steps, which you may need to do if you’re setting up a second line to avoid roaming charges while traveling. Choose the best plan for your current situation.
By turning on the toggle next to Allow cellular data switching, you can use both plans for cellular data. In this case, your iPhone will select the plan that provides the best performance at the time. However, this can make managing your data usage difficult, so we don’t recommend doing so unless you have high data caps on both plans.
- Once you’re satisfied with your Cellular Data selections, click Done to complete the setup of your second eSIM line.
You’ll be returned to your cellular settings screen, which will now look a bit different:
- Instead of a toggle, the Cellular Data option at the top now displays the label of the current plan.
- A new Default Voice Line option appears, allowing you to select which line your iPhone uses for incoming calls and text messages.
- A new SIMs section displays both of your personal lines. Selecting these will take you to the settings for each plan, such as 5G and roaming cellular data options, Wi-Fi calling, and voice and data.
- You may also notice that the cellular signal strength indicator in the status bar has been slightly modified; it is now divided into two sections so you can see the signal strength for both of your lines at a glance. Swiping down from the top-right will bring up the Control Center, which will show both of your lines along with their carrier tags and network status.
You can also read: iPhone 14 Pro review
How to identify incoming calls
You’ll be able to receive incoming calls on either line once your second line is operational. Your iPhone will display a small icon to indicate which line they are coming in on.
Normally, only the first letter of the label, such as “P” for Primary, “S” for Secondary, or “B” for Business, will be used. To avoid confusion between similar labels (for example, “Primary” and “Personal”), your iPhone may use up to four letters for each. It will instead assign a number after that.
These icons will appear not only on the incoming call screen, but also in the Phone app’s Recents and Voicemail lists.
How to Select an Outgoing Call Line
Unless you specify otherwise, your default line will be used for outgoing calls, whether to one of your contacts or manually from the iPhone keypad. Here’s how to choose your alternate line for an individual call:
- Open the Phone app.
- At the bottom, select Keypad.
- You should see the label for your default line at the top of the screen. Select it.
- From the pop-up menu that appears, choose the other line.
- Place your call normally. It will go out on the second line.
Unfortunately, you cannot do this while making a phone call to a contact. You’ll have to manually dial their number or change the line you’ve assigned to them. We’ll go over how to do that next.
You can also read: Apple iPhone 14 Pro vs. iPhone 13 Pro
How to Assign a Contact to a Line
Calls to any of your contacts will use the line that was most recently used with that contact by default. If you haven’t already called them or been called by them, the default line will be used.
You can, however, assign a specific line to any of your contacts. Once configured, that line will be used for all incoming calls to that person. This can be a useful way to differentiate between personal and business lines. Here’s how you do it:
- Open the Phone app.
- Select the Contacts button at the bottom of the screen.
- Locate and select a contact you would like to assign to a specific line.
- The current line will be shown beneath the contact’s name, with a prefix that indicates whether it’s the default line or the last-used line.
- Select this line to bring up the Preferred line selection.
- By default, the last used should be selected. If you want to change this, select the line you want to assign to this contact. If you’ve previously assigned a default line, you can also select Last used to restore it to its default state.
- Select Done when finished.
This not only affects the phone line used to call this contact; the selected number will also be used to send text messages, start iMessage conversations, and make FaceTime calls to this person. Existing conversations in the Messages app will continue to use the number they began with unless you explicitly change them to a different one.
You can also read: iPhone 14 and iPhone 14 Pro Buying Guide
How to Choose a Text Message Line
When you initiate a new text message or iMessage conversation with one of your contacts, your iPhone will use the line assigned to that contact, as described in the preceding section. However, you can change this at any time, including during ongoing conversations. Here’s how it’s done:
- Open the Messages app on your iPhone.
- Select the New message button in the top-right corner to open the New Message screen.
- Type in the contact name or phone number of the person you want to send a message to, then select Return on the keyboard.
- A “From” line will appear below the address, showing the line that will be used to send the message. Select this line.
- Choose the other line from the pop-up menu that appears.
- Proceed to send your message as you normally would.
- A few things to note:
- You can use this method to change your phone number for existing conversations. Follow the steps outlined above to enter the contact’s name or phone number for an existing conversation. After pressing Return, the conversation thread will appear, but you can still choose an alternate line to continue the conversation.
- To change your line for an ongoing conversation, select the Person’s name at the top of the conversation and then select your alternate line from the Conversation line button.
- When a number is changed during a conversation, a note is posted to indicate the change.
- If you haven’t enabled iMessage on your second line, switching to it will also cause your conversation to switch to green-bubbled SMS text messages. Enabling iMessage on your second line is as simple as going to Messages > Send and receive in the iPhone Settings app.
How to Temporarily Disable a Line
Just because you’ve added a second line doesn’t mean you have to keep it active all the time. With a quick trip into the Settings app, you can turn off either of your lines at any time. This is useful if you have a line that you only use when traveling or if you simply don’t want to be interrupted by business calls during your downtime. Unfortunately, Apple’s Focus modes continue to lack the ability to block or allow calls on a per-line basis.
- Open the Settings app on your iPhone.
- Select Cellular.
- Under Cellular plans, select the line you would like to disable.
- Select the toggle beside Turn on this line to turn it off.
All references to that line will be hidden from your iPhone once disabled. You won’t see separate signal strength indicators, and the line indicator icons next to your recent calls will disappear until you turn the line back on. Calls will still be routed to your voice mailbox if you have one, but they will not reach your iPhone. Disabling a line is the same as removing your iPhone’s SIM card entirely.
It’s worth noting that this isn’t limited to your secondary eSIM line. You can disable your primary line and only use your secondary one if you prefer. In fact, you can disable both lines, in which case your iPhone will act as if it has no SIM card installed, even displaying “No SIM” in the status bar.
You can also read: New Apple iPad Air 4th Generation
How to Permanently Remove Your Second Line
If you no longer require your secondary line, you can deactivate it on your iPhone in a few simple steps. However, keep in mind that this will not cancel your line with your carrier; you will still need to call them to do so, as you normally would.
- Open the Settings app on your iPhone.
- Select Cellular.
- Select the line you want to remove from Cellular plans. You can only remove an eSIM-provisioned line from this page. To remove a line associated with a physical SIM card, simply remove the SIM card from your iPhone.
- Scroll to the bottom of the settings page and click Delete eSIM. On older versions of iOS, this may be displayed as Remove cellular plan.
- To confirm, select Delete eSIM. On older versions of iOS, this may be labeled Remove [carrier name] plan.
Your iPhone’s plan will be removed. Keep in mind that you may need to contact your carrier to reactivate your line, so don’t disconnect it unless you’re certain you’re done with it.
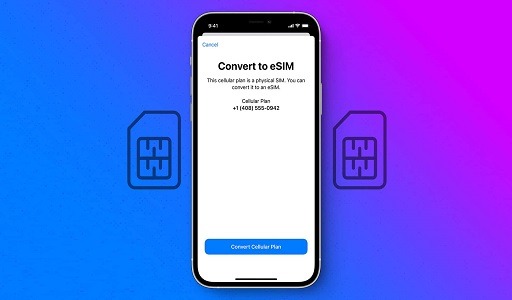
How to Switch from a Physical SIM to an eSIM
If you want to avoid using a physical SIM card altogether, many carriers will allow you to transfer your physical SIM card to use the eSIM built into your iPhone instead.
While this is rarely a cause for concern, it is a good way to free up your physical SIM card slot if you plan to travel to another country and are unsure whether the mobile operators there will accept an eSIM.
Furthermore, the majority of iPhone 13 and iPhone 14 models support dual eSIM, allowing you to transfer your physical SIM card to an eSIM while keeping another eSIM available for a second line.
Apple simplifies the transfer process for people who use certain carriers. If this option is available, a Convert to eSIM button should appear under Cellular Settings. If this does not appear, you may be able to convert your physical SIM to an eSIM by contacting your carrier directly for instructions.
Would you like to read more about eSIM-related articles? If so, we invite you to take a look at our other tech topics before you leave!
![]()