Stellar Repair for MS SQL: Stellar Repair for MS SQL is designed to repair data from damaged or corrupt Microsoft SQL Server database (MDF files). Microsoft SQL Server database files (MDF) can get damaged or corrupted due to a number of reasons such as virus attack, unexpected system shutdown, media read error, and so on.
However, using strong algorithm, Stellar Repair for MS SQL does a complete repair of the corrupt MS SQL database and efficiently repairs almost every bit of information without deleting or modifying original data.
Even a heavily damaged database can be optimally repaired and restored with this software. After repairing, Stellar Repair for MS SQL provides preview of database in a tree structure. User can view the components
of selected database and can save desired components.
Features of Stellar SQL Database Repair Tool
- Find an option to search items of the database while previewing.
- Option to save repaired database as MDF, CSV, HTML, and XLS.
- Option to save repaired database to SQL Server Authentication.
- Option to recover deleted records.
- Option to save repaired database to New or Live database.
- Option to save the scan information to resume the repair process at a later stage.
- Shows preview of the database before saving.
- Supports advanced scan option (for highly corrupted files).
- Supports Sequence Objects in MS SQL Server.
- Supports MS SQL Server ROW Compressed data.
- Supports MS SQL Server PAGE Compressed data.
- Supports Standard Compression Scheme for Unicode (SCSU) in SQL Server.
- Recovers Column Row GUID COL Property.
- Recovers Sp_addextended Property.
- Saves non-recovered queries, views, stored procedures, etc. in a text file.
- Supports automatic recreation of a new database having all the recovered database items.
- Supports large SQL Server MDF files for all versions.
- Supports XML data types, XML indexes, SQL Server FILESTREAM data types, SQL Server sparse columns, SQL
Server columns set property. - Supports separate log report after scanning database.
- Supports Sorted tables in tree view and generates sorted log report.
- Supports fast scanning algorithms.
- Supports total row count detail in each table for all versions.
- Supports recovery of Tables, Triggers, Views, Collations, Recovery of Stored Procedure, Synonyms, Functions,
Defaults and Default constraints, Primary Keys, Foreign Keys, Unique Keys, Identity, Indexes (Clustered, Non –
Clustered indexes), Check constraints, User Defined Data Types, Null / Not null, Predefined defaults, default values, and Rules. - Compatible with MS SQL Server 2019, MS SQL Server 2017, MS SQL Server 2016, MS SQL Server 2014, MS SQL
Server 2012 R2, 2012, MS SQL Server 2008 R2, 2008, 2008 (64 bit), 2008 Express, MS SQL Server 2005, 2005 (64bit), 2005 Express, MS SQL Server 2000, 2000 (64 bit), 7.0 and mixed formats. - Operating system: Windows Server 2012 / 2008 / 2003 and Windows 10 / 8.1 / 8 / 7.
You may also like Does the DBCC CHECKDB Repair Options Ensure Complete Recovery
How to Install Stellar SQL Database Repair Tool
Before you begin the installation procedure, make sure your computer meets the minimum system requirements.
Minimum System Requirements:
- Processor: Intel-compatible (x86, x64)
- Memory: 32 GB (recommended) 16 GB (minimum)
- Hard Disk: 250 MB for installation files
- MS SQL Server: MS SQL Server 2019, MS SQL Server 2017, MS SQL Server 2016, MS SQL Server 2014, MS SQL Server 2012, MS SQL Server 2008 R2, 2008, 2008 (64 bit), 2008 Express, MS SQL Server 2005, 2005 (64 bit), 2005 Express, MS SQL Server 2000, 2000 (64 bit), 7.0 and mixed formats.
- Operating System: Windows Server 2019 / 2016 / 2012 / 2008 / 2003 and Windows 10 / 8.1 / 8 / 7
Follow the steps below to install the software:
- Double-click on Setup installer, a dialog box is displayed.
- Click Next to continue. License Agreement dialog box is displayed.
- Select I accept the Agreement option. Click Next.
- Specify the location where the installation files are to be stored. Click Next.
- Select the folder where the files are to be stored. A default folder is suggested in the box. Click Browse to select a different location. Click Next.
- In the Select Additional Tasks dialog box, select check boxes as per your choice. Click Next.
- Review your selections. Click Back if you want to make any change. Click Install to start the installation. The Installing window shows the installation process.
- After completion of the process, Click Finish on the Setup installer dialog box.
Note: Clear Launch Setup installer checkbox to prevent the software from launching automatically.
You may also like How to prevent Cross-Site Scripting using HTML, JavaScript, and DOM
Stellar SQL Database Repair Tool User Interface
Stellar Repair for MS SQL has a simple and user-friendly interface that lets you access its various feature with ease.
After launching the program, you will see the interface as shown below:

When you start Stellar Repair for MS SQL, the Select Database dialog box opens as shown below:

Ribbons and Buttons
1. File Ribbon
- Select Database: Use this option to select the corrupt SQL database for repairing.
- Save: Use this option to save the repaired SQL database.
- Stop: Use this option to stop the repairing process.
- Find: Use this option to find a particular item in the database file while previewing.
2. View Ribbon
- Save Log: Use this option to save the repaired SQL database.
- Clear Log: Use this option to clear the log report.
- View: Use this option to view or hide the Status Bar and Log Window.
- Deleted Records: Select this check box to show or hide deleted records in the tree view (if found) during the previewing process.
3. Tools Ribbon
- Update Wizard : Use this option to update the software.
4. Help Ribbon
- Help Topics: Software is accompanied by a descriptive help document. Use this option to view the help manual for the software.
- Knowledgebase: Frequently asked questions and other common queries are available as a knowledgebase for your reference and to help you use the software to get the best outcome. Use this option to visit Knowledgebase articles of stellarinfo.com
- Support: In case you don’t find any related content in the help document or on the knowledgebase page that resolves your query, use this option view the support page of stellarinfo.com, and contact Stellar customer support.
- About: Use this option to read more information about the software.
5. Buy Now Ribbon
- Buy Online: Use this option to buy Stellar Repair for MS SQL.
6. Activation Ribbon
- Activation: Use this option to activate the software.
How to activate the Stella SQL software
The demo version is just for evaluation purposes and must be eventually activated to use the full functionality of the software. The software can be activated using the Activation Key that you receive via email after purchasing the software.
Note: Make sure that you have an active Internet connection.
To activate the software:
- Run Stellar Repair for MS SQL.
- Click the Activation button on the Activation ribbon. A window, as displayed below, pops up on the screen.
- Enter the Activation Key and click Activate button.
- The software is activated after successful verification of the Activation Key you have entered.
- ‘Activation Completed Successfully‘ message is displayed after the process is completed successfully. Click OK to use all the options of the software that have been unlocked after the activation.
If you receive an error while activating the software, follow and verify the steps given below to fix the issue:
1. Check Installer and Re-enter Activation Key
Make sure you have downloaded the correct installer. Use the download link given in the email or visit the desired product page to free download the software and then activate it using the code provided in your email.
2. Uninstall All Other Versions of the software
Uninstall any version of the software you may have installed earlier. Then re-install the desired version of the software and activate it.
3. Re-Enter the Correct Activation Key Without Blank Spaces
If copy and pasting the activation key isn’t working, try to enter it manually. Sometimes, while copying, you may copy the blank spaces, which can cause software activation failure.
Entering the key manually overcomes this issue. Alternatively, you may copy the key from the email to notepad and then remove empty space from the beginning and end of the key. Then copy and paste the key into the activation window of the software.
How to Update your Software
There are periodical software updates for Stellar Repair for MS SQL. Using the update option, you can check for both the latest minor and major versions available online. You can easily download the minor and major versions through the update wizard. While updating the software, it’s recommended to close all the running programs.
Follow the steps below to update Stellar Repair for MS SQL:
- Run Stellar Repair for MS SQL software.
- Select Update Wizard from Tools ribbon.
- Update Wizard window pops up.
- The wizard will start searching for the latest updates and if it finds any new version, a window will pop up indicating the availability of an update.
- Click Next and the software will start downloading updated files from the server. When the process is complete, the software will update to the latest version.
Select MS SQL Database (MDF) File
Stellar Repair for MS SQL repairs MS SQL Database (MDF) files and allows you to save them to your preferred location. You can also preview the repaired database before saving it. For repairing the file you can either browse and select the corrupt MDF file from the desired location, or if you do not know the path where the corrupt MDF file is placed, you can use the Find option.
Use the steps below to select the MDF file:
Stellar Repair for MS SQL allows you to select MS SQL database (MDF) files from your computer for the repairing process.
- Open Select Database dialog box by choosing Select Database icon from File ribbon.
- In Select Database dialog box, click Browse.
- Open dialog box will appear. Browse and select the desired file and then click Open.
Note: Select ‘Include Deleted Records’ check box to recover deleted records (if found) during the repairing process.
Follow the steps below to find MDF File:
Stellar Repair for MS SQL also allows you to search for MS SQL database (MDF) files on your computer. Using the Find option, you can search for MS SQL Database files in your computer’s drives, folders, and subfolders. However, you can only select one drive at a time to find MS SQL Database files.
How to find MDF files in drives, folders, and subfolders:
- Open Select Database dialog box by choosing Select Database icon from File ribbon.
- From Find section, select the drive, folder or subfolder you want to search for MDF files. Click OK.
- After the search is finished, a list of MS SQL Database files found in the selected drive is shown.
- Select file you wish to repair from this list and click Repair button to select the scan mode on the next screen.
Note: Select ‘Include Deleted Records’ check box to recover deleted records (if found) during the repairing process.
Note: Click Clear List button to clear the search result.
You may also like Online Database Applications for Enterprises – Reviewing Some Standard Use Cases
How to Include Deleted Records
Stellar Repair for MS SQL provides you an option to include deleted records in MS SQL database (MDF) repaired file.
Use the steps below to include deleted records:
- Select the file by clicking on the Select Database icon from the File ribbon or from the list of MS SQL Database files found, select the desired file to repair.
- Select ‘Include Deleted Records’ check box to recover deleted records (if found) during the repairing process.
- Click Repair to select the scan mode on the next screen.
Select the Scan Mode and Repair MDF Files
How to repair MS SQL Database files:
After selection of MS SQL Database (MDF) file that you want to repair, click Repair. Select scan mode dialog box opens. Stellar Repair for MS SQL has two modes for scanning:
- Standard Scan (Recommended) – Select Standard Scan to scan and repair corrupt .MDF files that are not highly corrupted.
- Advanced Scan – Select Advanced Scan to scan the extremely corrupted .MDF files for better and effective results.
Click OK to start the repairing process. Repairing of the selected files is performed by the tool.
Note: The software performs a counting of records present in the database during the repairing process.The time taken in counting depends on the number of records present in the database. You can skip the counting of records to speed up repair process without affecting the repair results.
After the completion of the repairing process, a message appears indicating the successful completion of the process.
Note:
- If the selected database file is heavily corrupted and the application is unable to detect the database file version, then you can select the database version manually from the dialog box that appears as shown below:
- If in case you select invalid version of the database file, then a message prompts on the screen indicating the inappropriate version of file.
- To proceed to the repairing process, you need to select the appropriate version.
How to Save Scan Information
Stellar Repair for MS SQL saves scan information of the MS SQL Database (MDF file) at the time of repairing. This saved scan information can be used later to repair a corrupt database in case you wish to repair the database file again.
Using a scan information saves time, since scanning of each database file does not take place. All files and folders shown after scan process can be viewed as we load the saved scan information created for that particular scan. You can resume recovery by selecting the saved scan information without scanning the database again.
Follow the steps below to Repair Database using scan information
- You will be prompted to use the saved scan information for selected database.
- Click Yes if you want to repair using the existing saved scan information.
- Click No if you want to repair using selected database itself.
How to Preview and Save MDF Files
After you complete the repairing process successfully, Stellar Repair for MS SQL shows a preview of corrupted database files. The left pane displays a list of items (Tables, Views, Synonyms, Defaults, Data Types, and more) in a tree-like structure, the upper right pane displays the contents of the item selected in the tree view and the bottom pane shows message log.
By default, all the checkboxes of the tree view are selected. You can click on the item in the tree view to preview its content.
Note: The software performs a counting of records present in the database after repairing process is completed. The time taken in counting depends on the number of records present in the database. You can stop the counting of records to speed up repair process without affecting the repair results.
Use the steps below to save the repaired file to MS SQL database:
- After the repairing process gets completed, click Save option from File ribbon.
- Specify whether you want to save the repaired database in New Database, Live Database or Other formats such as CSV, XLS or HTML format by selecting the appropriate radio button.
- Saving Repaired Database as New Database
- Saving Repaired Database as Live Database
- Saving Repaired Database in Other formats
To save the repaired database as a completely New database, follow the steps mentioned below:
- Select New Database radio button from Saving option in Save Database dialog box.
- Click Next. A Connect to Server dialog box appears.
- Enter Server Name/Instance Name.
- Choose the Authentication method from the drop down list to connect the server:
- If the authentication method selected is Windows Authentication, you need not enter any user name and password:
- If the selected authentication method is SQL Server Authentication, enter the server user name and password:
- Select the Location from Default SQL or New for saving the repaired MDF file.
- If you have selected the Location as New, click Browse to select the folder where you want to save the repaired file.

- Click Next. Select the Save Mode option and click Save to continue the process.
- If you want to save large database, select Fast Saving radio button.
- If you want to save the data and indexes at the same time, select Standard Saving radio button.
- Click Save button to save the repaired MS SQL Database file.
- Saving Tables dialog box appears that consists of four columns as follows:
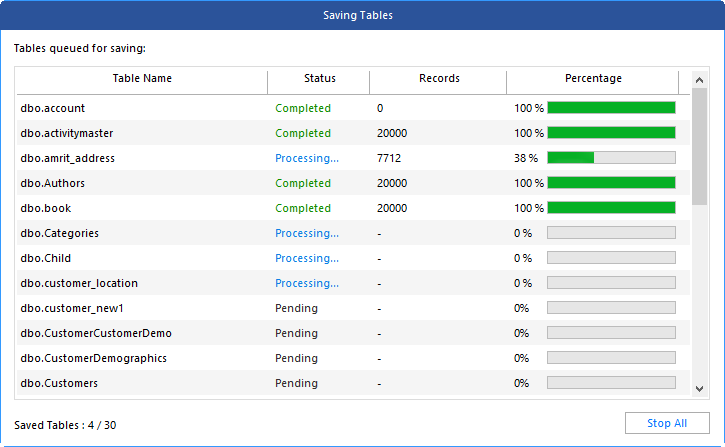
- Table Name: This column provides a list of Tables from the repaired file that you have sorted from the previous screen for export.
- Status: This column provides information about the table whether the save process is Completed, Processing, Pending, Aborted.
- Records: This column provides the total number of items processed from the source to the destination Table.
- Percentage: This column provides information about the progress of the saving process in percentage.
Stellar Repair for MS SQL can process up to eight tables at the same time. You can stop the saving process using the steps as follows:
- To stop the saving tables process, click Stop all button. A Stop dialog box appears to confirm your action as given below:
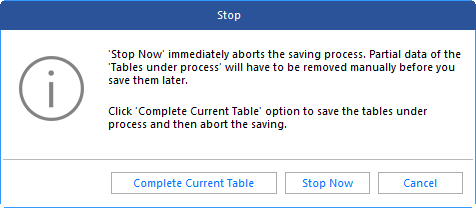
- If you want to save the tables that are currently being processed and then stop the saving process, click Complete Current Table.
- If you do not want to complete the saving of tables that are currently being processed and stop the saving process, click Stop Now. If you immediately stop the process, only the partial data of the table that is currently being processed will be saved in the destination table.
- To go back to the Saving Table screen and continue saving the tables, click Cancel.
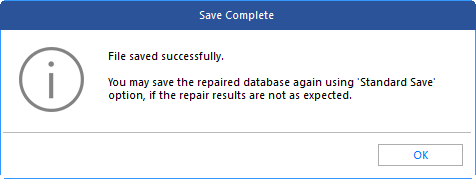
- A message is displayed after the process is completed successfully.
Note: After saving the repaired files if you do not find the expected result you can use the “Standard Save” option and resave the repaired files.
To save the repaired database as a completely Live Database, follow the steps mentioned below:
- Select Live Database radio button from Saving option in Save Database dialog box.
- Click Next. A Connect to Server dialog box appears.
- Enter Server Name/Instance Name.
- Choose the Authentication method from the drop-down list to connect the server:
-
- If the authentication method selected is Windows Authentication, you need not enter any user name and password:
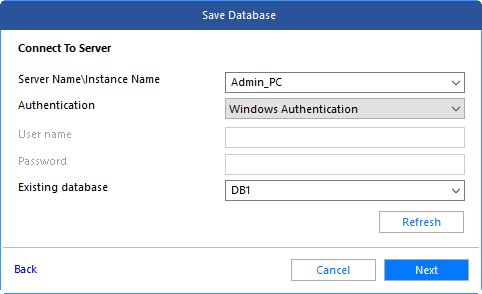
- If the selected authentication method is SQL Server Authentication, enter the server user name and password:

- Select Existing Database from drop down list.
Note: Click Refresh Button, If any database is not listed in drop down list and is there in the SQL Server.
- Click Next. Select the Save Mode option and click Save to continue the process.
- If you want to save large database, select Fast Saving radio button.
- If you want to save the data and indexes at the same time, select Standard Saving radio button.
- Saving Tables dialog box appears that consists of four columns as follows:

- Table Name: This column provides a list of Tables from the repaired file that you have sorted from previous screen for export.
- Status: This column provides information about the table whether the save process is Completed, Processing, Pending, Aborted.
- Records: This column provides the total number of items processed from the source to the destination Table.
- Percentage: This column provides information about the progress of the saving process in percentage.
Stellar Repair for MS SQL can process up to eight tables at the same time. You can stop the saving process using the steps as follows:
To stop the saving tables process, click Stop all button. A Stop dialog box appears to confirm your action as given below:
- If you want to save the tables that are currently being processed and then stop the saving process, click Complete Current Table.
- If you do not want to complete the saving of tables that are currently being processed and stop the saving process, click Stop Now. If you immediately stop the process, only the partial data of the table that is currently being processed will be saved in the destination table.
- To go back to the Saving Table screen and continue saving the tables, click Cancel.
A message is displayed after the process is completed successfully.
Note: After saving the repaired files if you do not find the expected result you can use the “Standard Save” option and resave the repaired files.
Follow the steps below to save the repaired file in Other Formats:
- Select Other formats radio button from Saving option in Save Database dialog box and Select the required file format.
- Click Next. Click Browse to select the desired folder where you want to save the repaired file and click Save button.
Note: By default open destination folder after saving repaired database checkbox is checked. If you do not want to open the folder you can uncheck the checkbox.
- The file will be saved in the desired format.
Note: Perform repair process on the copy of database and make sure MS SQL Server is running during repair process.
How to Find Specific Item In Tree
Stellar Repair for MS SQL gives option to search particular items in tree view. After completion of repairing process, a Search window appears as shown below:
To Search a particular item, enter its name in the text box and click Search button. If that item is present in the database, it is highlighted in tree. Use back and forward button to traverse in the tree.
To narrow down the search result, you can select Match Case or Match Whole Word check box.
How to Save Log Report
With Stellar Repair for MS SQL, you can save the Log Report to analyze the repairing process at a later stage. You can view log of the process at the bottom of the user interface. If this pane is not visible, you can enable it by selecting the Log Window checkbox in View section of View ribbon.
To save log report:
- From View ribbon, select Save Log.
- In Save As dialog box, select the location where you want to save the log report. Click Save.
To clear log report:
- From View ribbon, select Clear Log.
Would you like to read more about Stellar SQL Database Recovery Tool-related articles? If so, we invite you to take a look at our other tech topics before you leave!
![]()


