How to install MySQL: When developing and managing a website, it is necessary to take into consideration the kinds of information that the website will provide and keep. If the web page only displays static content that can be accessed through a variety of drop-down menus, then we can use any program that enables us to make changes manually to create web pages.
However, if we want to be able to manage user data and conduct searches, we will need a database that is in charge of managing all of the information that is found on the web. MySQL in conjunction with PHPMyAdmin is the solution to this problem.
What are MySQL and PHPMyAdmin
Oracle’s MySQL is a powerful database manager that is used to collect and organize all of the data that is found on a web page. Because its use is entirely free and it is licensed under the GPL, it is one of the most widely used databases around the world when it comes to managing large amounts of data.
Because it can only be operated through the use of a command line, interacting with MySQL can be a real pain if we do not have any prior experience with the administration of dynamic web pages. If we make even one command mistake, it is possible that we will directly break the website.
Utilizing PHPMyAdmin is the way to solve this issue, which also gets rid of a significant portion of the headaches that are caused by it. PHPMyAdmin is a graphical user interface that is not only open source but also totally free.
It makes working with MySQL databases significantly less complicated and gives us more freedom to do so. Since we are able to execute commands in the database directly from the user interface of PHPMyAdmin, the likelihood of us making mistakes in the code is significantly reduced.
As a result, there is less of a chance that a website that we manage will be inaccessible until we discover and correct the error.
You may also like: Stellar SQL Database Repair Tool for MS SQL
How to install MySQL
MySQL is offered for both Linux and Windows, even though the vast majority of web servers are managed by Linux. If a user does not intend to manage a website from their personal computer, it is highly unlikely that they will find themselves in a position where they need to install MySQL on Windows.
Install MySQL on Windows
On Linux, we can use the repositories that are already installed on the computer to download MySQL. However, on Windows, we must visit the following website to download it and press the Go to Download Page button in order to download the version that we want to install. In Linux, we can use the repositories that are already installed on the computer to download MySQL.
On the one hand, you will find the installer, which takes up 5 MB of space, and on the other, you will find all of the applications that are required to install MySQL, which takes up slightly more than 400 MB of space.
If we choose to use this most recent version of the software, the installer will not download any additional content from the internet in order to complete the installation. In the event that we go with the 5 MB version, we will need to be connected to the internet in order to download the information that we require.
It will ask us to register on the website in the following window in order for us to download it; however, we can bypass this step by clicking on the link that says “No thanks, just start my download.”
After we have downloaded it, we run it just like we do with any other file by double-clicking on the file that has the.msi extension and then waiting for the process of installing it to finish.
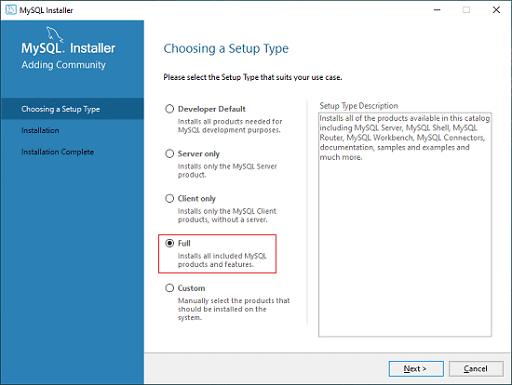
When the procedure has been completed, a new window containing the MySQL installer will open. In this window, we will need to choose the kind of server that we want to create.
- DeveloperDefault . This is the ideal option as it will install everything you need to create a MySQL database.
- Sever only . To install MySQL in server mode.
- Client-only . Install it in client mode without a server.
- full . Install all MySQL products.
- custom . Allows us to select what type of MySQL products we want to install.
In the following window, it will determine whether or not we are missing any applications that are required to use MySQL, such as MySQL for Visual Studio or Connector/Phyton. If we are, then the process will continue. If that is the case, we will have to do the installation on our computer by hand.
Next, an overview of everything that will be saved to the hard drive and installed on the computer will be shown to the user.
To move forward, select the Execute option. Using the basic installer, which is 5 megabytes in size, it will display an error message if any of the components do not download correctly. To reattempt downloading it, all that is required of us is to click the Try again button.
In the following window, the installer will ask us to select the folder on the computer in which we would like the program to be installed. After we have successfully installed the MySQL server that we require, the installer will lead us to the Product Configuration option.
Here, we will have to configure the TCP/IP ports and request that Windows grant the Firewall permission to access the MySQL server. The next step is to decide on a password for access that we will use to keep unauthorized users out. Simply launching the MySQL application gives us access to the server, after which we can proceed to set up the database and access the server that we have just created.
You may also like: Does the DBCC CHECKDB Repair Options Ensure Complete Recovery
How to install MySQL on Linux
After we have successfully installed Nginx (or any other web server), the very first thing that we need to do is run the command to update the list of repositories.
sudo apt update
Following this, we will install MySQL by utilizing the repositories that are available to us in the version of Linux that we have using the command.
sudo apt install mysql-server
The first thing that needs to be done is the creation of a master password, which is a password that will grant us access to the database management and modification functions.
It is recommended to use a password manager to generate a complex password in order to prevent access from being gained by unauthorized users. After the installation has been completed, we will use the command that we will show you below to remove the pre-installed default settings and disable access to the database. This will ensure that the database can only be accessed using the password that we will create.
sudo /usr/bin/mysql_secure_installation
Following that, it will pose a number of questions to us, all of which require an answer, as is demonstrated below:
- Change root password? N
- Remove Anonymous user? Y
- Disallow root login remotely? Y
- Remove test database and access to it? Y
- Reload privilege tables now? Y
Therefore, we are going to keep the password that we just created, and we are also going to take away access for anonymous users, disable access from remote locations, remove the sample database, and reload the privilege table.
After we have successfully installed MySQL, the next step is to create our database; however, this requires that we have the necessary expertise. Installing PHPMyAdmin is the solution in that case, as I mentioned earlier in this paragraph.
You may also like Online Database Applications for Enterprises – Reviewing Some Standard Use Cases
How to install PHPMyAdmin
As was the case in the earlier example, the majority of web servers are managed by Linux; however, if we use a Windows server, we can also use PHPMyAdmin to manage MySQL databases in a more user-friendly manner.
How to use PHPMyAdmin on a Windows computer
Next, we unzip it and copy it to the directory of the MySQL server that we have previously installed. To access the server and configure it, we just have to enter the following URL in our browser (in this way, it is not necessary to configure which is the server where we want to use it in combination with MySQL).
http://localhost/phpmyadmin/setup/index.php
Install PHPMyAdmin on Linux
Installing PHPMyAdmin through the command line with the help of the following command is the first thing on our to-do list:
sudo apt-get install phpmyadmin
During the process of installation, the first thing that we are required to do is choose the web server on which we have installed MySQL.
Additionally, during this step, we are required to configure the database administrator so that they are able to use it with the password that was established during the process of installing MySQL. After the PHPMyAdmin installation has completed, we will need to enter the following commands in order to ensure that the installation was successful.
sudo phpenmod mcrypt sudo phpenmod mbstring
Once the procedure has been completed, we will restart the server in order to ensure that the changes take effect. Once we have PHPMyAdmin installed, we will use our web browser to access it through the following url, and then we will begin the process of creating and managing the database with MySQL by employing a graphical user interface rather than the command line.
http://localhost.phpmyadmin/
Would you like to read more about how to install mysql-related articles? If so, we invite you to take a look at our other tech topics before you leave!
![]()