Cat6 Wiring Diagram: Adding a Cat6 Ethernet connection to your wiring is a simple method to make your network administration more effective. This procedure is straightforward and uncomplicated, and we have included everything you require to get started, including a comprehensive wiring schematic, in this article for your convenience. So how exactly do you go about wiring your own Cat6 cables?
What Exactly is an Ethernet Cable Cat6?
Two nodes on a network can be connected via Ethernet cables, which are also referred to as network cables. This kind of cable will be able to bridge the space between your router or switch and the computer you use in the majority of residential settings, thereby enabling high-speed communication between the two devices.
It is possible to disassemble an Ethernet cable into its two primary components, which are a UTP cable and an RJ45 header connection. Unshielded twisted pair (UTP) cables come in a few different varieties, the most common of which are Cat6, Cat5e, and Cat5. Cat6 cables have a bandwidth of 10 Gbps at 250 MHz, whereas Cat5e cables can only attain speeds of one gigabit per second. As a result, Cat6 cables are able to transmit more data than Cat5e cables.
No matter the sort of Ethernet cable you choose, the RJ45 connector that can be located on the cable’s end will always be the same. It is important to note that shielded RJ45 connectors and Cat6 cables can be utilized in settings that have issues with crosstalk.
RJ45 Connector: Cat6 Cable Wiring Diagram
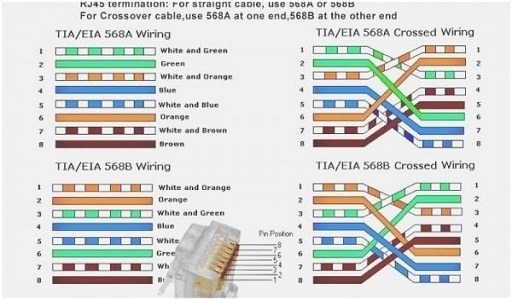
It is simpler than you may think to wire your own Cat6 Ethernet cable, at least after you have the relevant information in front of you. The steps that are provided below will guide you through the more intricate aspects of the process, and the Cat 6 wiring diagram that is provided above will serve as a reference for you to use.
Because both the T-568A and the T-568B configurations are compliant with the ANSI/TIA-568-C wiring standards, both of these configurations have been represented in the diagram. You are free to utilize one of the two configurations for the network cables, provided that you use the identical configuration on both ends of the Cat6 wire.
To finish this process, you are going to require a number of different tools and components.
- pliers with side cutters and/or a wire stripper
- A crimp tool for RJ45 connectors
- 1 meter of a Cat6 cable’s length
- 2 x RJ45 connectors
-
Trim the Cable to the Desired Length
The initial step in this process is the one that presents the fewest challenges. You will only need to adjust the length of the cable by cutting it. For this, we use side cutters; however, you can use any kind of wire cutter so long as it is powerful enough to cut through Cat6 cable.
In this situation, you can make use of a measuring tool in the form of a piece of string, which will make it much simpler for you to measure in tight quarters and around corners. Put the cable in the pliers of the cutting tool, apply pressure, and make sure the cut is as level as you can get it before you remove the cable.
-
Stripping Copper Cables
Following this, you will need to strip your copper wiring in order to expose the inner twisted pairs. When you do this, you only need to trim approximately an inch off of each end of the cable. This will leave sufficient space for the RJ45 jack to fit comfortably on the end.
-
Getting ready to assemble the twisted pairs
You still need to perform a little bit more stripping at this point, in addition to putting the twisted pairs in the correct positions and organizing them. Along with a teeny X-shaped separator made of plastic, the Cat6 cable that you are working with consists of an interior that contains four different sets of twisted pairs. You need only remove the divider by cutting it out.
Before gently stripping each of the small wires of about a quarter of an inch of their insulation, you should first untwist the small cables so that each one may be moved independently. Because the cores inside the wires are solid, it is simple to stay clear of a significant mess.
After that, you can arrange your wires such that they correspond to the diagram that was just shown to you, taking care to ensure that the orientation is accurate.
-
Connecting the Wires to the RJ45 Connector
Now that your wires are neatly arranged, you can proceed to plug them into the RJ45 socket. Because this can be a tricky process, it is advisable to attempt to insert all of the wires at the same time if at all possible. Before you crimp the connection, the wires must be inserted into the jack to the fullest extent possible.
-
Crimping a Cat6 Cable
Because RJ45 jacks are made to be compatible with universal crimping equipment, finishing this part of the project is a breeze and doesn’t need any effort at all. Simply ensure that your RJ45 connector is positioned appropriately within the crimping tool’s jaws before applying significant force to your downward pressure. When you look through the clear plastic shell of the connector, you will be able to tell whether or not all of the wires have been properly placed.
-
Perform a Quality Check on Cat6 Patch Cable
You will be able to put your Cat6 Ethernet cable through its paces after you have finished successfully wiring both ends of the line. You can purchase network cable testers to determine whether or not you have correctly carried out the procedure, but you could also connect your cable to your computer as well as a router or switch to determine whether or not the connection is robust and reliable.
It is highly improbable that this will be completely resolved on the very first try that you make it. A little bit of patience will take you a long way when it comes to this task because it is complicated and can take some time to master.
The benefits of wiring Cat6 cables are discussed in this article.
When you wire your own Cat6 cabling, not only will you save money and space, but you will also have the opportunity to design a neat network that will be easy to live with. This is a win-win situation. It is considerably simpler to take this route than it is to locate a provider of bulk Ethernet wire because big rolls of Cat6 cabling and bags of RJ45 connectors are both available for purchase online.
Cat6 Wiring Simplified
You now have all of the information that you require to get started wiring your own Cat6 cables, which is easy to do, just like we said it would be. Cutting should be done with as little mess and as much accuracy as possible. This is the most important thing to keep in mind. Accurately cutting your Cat6 wiring makes crimping and wiring the connector much simpler to do. You’ll start to question why you’ve never attempted to wire your own Cat6 Ethernet wires in the past.
Would you like to read more about cat6 wiring diagram-related articles? If so, we invite you to take a look at our other tech topics before you leave!
![]()